A little something that I finished today - Details as soon as I can take pictures!


OWOP: Day Two
Another day, another Peony! (Literally - My goal today is to make a third Peony, using two different Alexander Henry Larkspur prints, and borrowing the ruffle from the Coffee Date Dress by the Selfish Seamstress!


(Fabric pictures linked from Hawthorne Threads.)
Sweater Refashion!
A few months ago, my Mom donate this boiled wool sweater to my crafting pile. It had ratty wool fringe around the edges, and was looking dated. Fast forward a few months, and Mom’s birthday was coming up… so being the frugal (i.e. broke) daughter that I am, I decided to give it back to her!
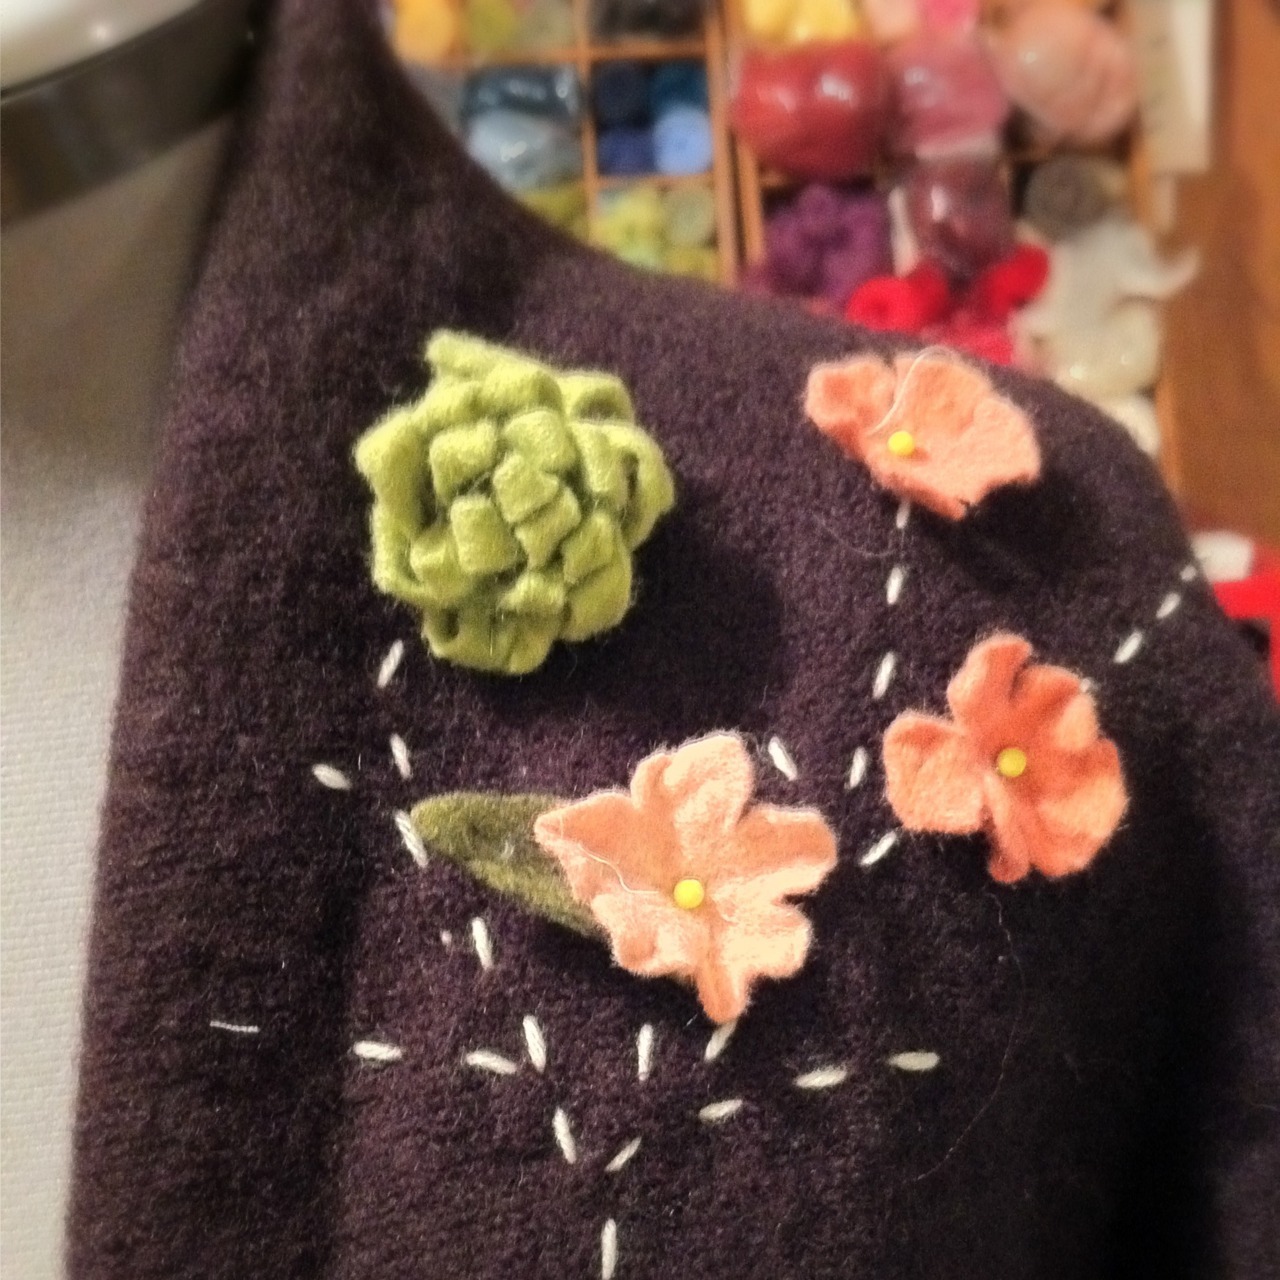
The first thing I did was cut off all the fringe! I also rolled the shawl collar under and hand-stitched it in place with brown wool. It makes much more flattering collar! I also used the machine to take in the sides a bit to make it all less boxy. I debated some more drastic changes, but decided to keep it simple!
Then came the fun part: Embellishing! I’m a total sucker for cherry blossoms, so I grabbed a piece of Japanese sakura fabric for inspiration. While the sweater was on the dress form, I did a running stitch in cream wool for the branches. I started playing with wool flowers leftover from my latest round of broach-making, and voila! Cherry blossom sweater. I actually did some needle-felting on the flowers too, but didn’t really like how it looked… I ended up stitching a cream cross-stitch on each blossom instead. Sometimes enough is enough!
I always find it a bit awkward giving people handmade gifts - There’s always a part of me that worries they are faking that they like it! I’m happy to say that Nom was wearing it yesterday! More pictures to follow!


Nerd Pouch!
It was my brother-in-law’s birthday this week, so I whipped him up a little zippered pouch… featuring Pac-Man and computer circuit fabric! I ordered the fabrics at Christmas, and I’ve been waiting for the perfect project to showcase them. My BIL owns just about every North American or Japanese video game system ever, and works at a tech company, so it was the perfect pairing!
For the last 3 years, my BIL spent every March visiting us in Japan (including last year, during the earthquake!) It’s the end of an era for us all, not to have this month together! Happily, he’s spending his vacation time in Florida this year, so at least he’ll have a chance to relax. Still, somehow missing this vacation with him makes it feel very strange not to be in Japan any more!

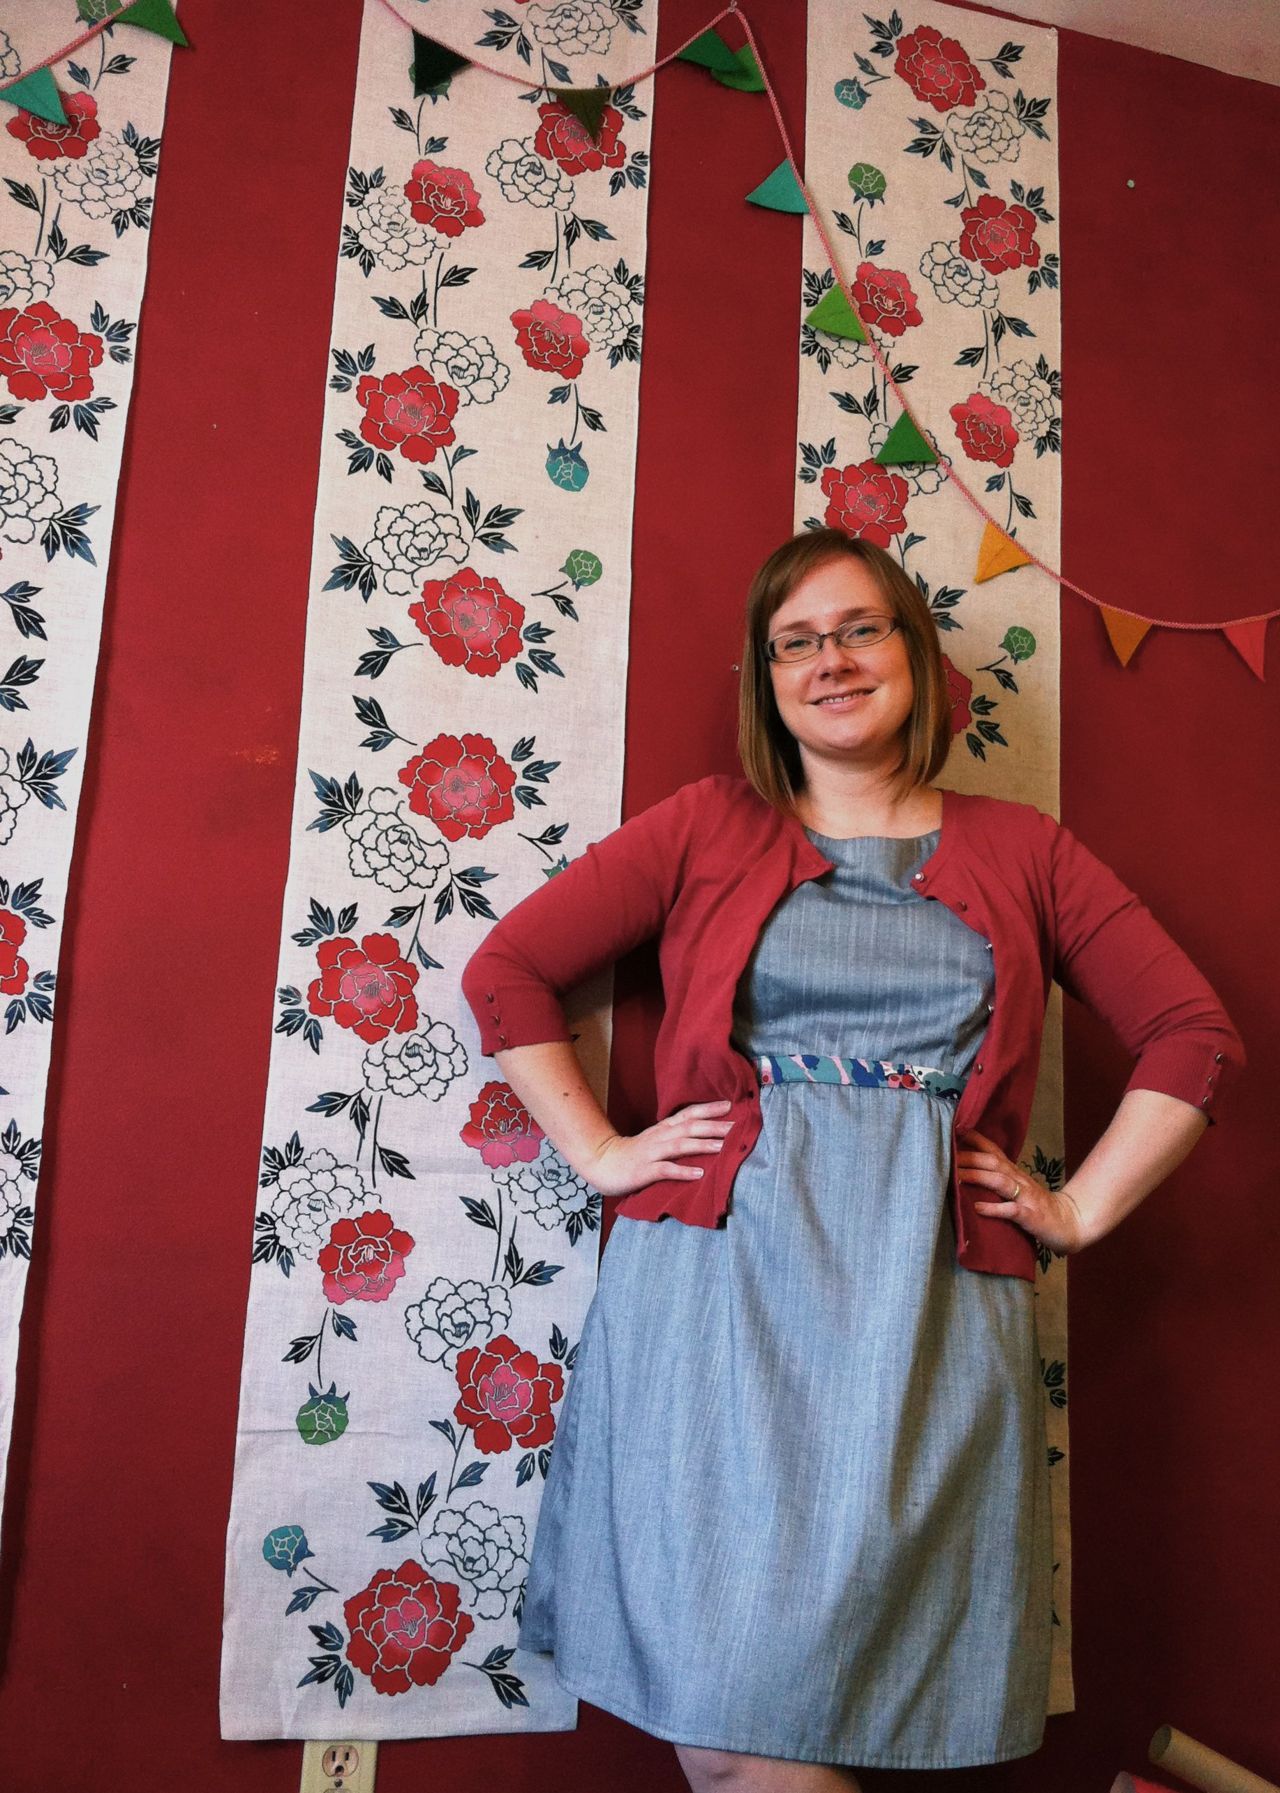
Colette Peony #1!
The Peony is my favourite Colette dress. I love the boat neck, the a-line skirt, and that it doesn’t use too much fabric! (I’m looking at you, Colette Crepe!) It’s the perfect teaching dress: pretty and professional, but effortless! Nothing is going to show, slide around, or cause a fuss.
In theory, this is a wearable muslin - A practice attempt with a pattern that’s good enough to see the light of day! I did two practice muslins of the bodice using old bedsheets before this, and had to make a heap of changes… shortened the bodice A LOT, took 5cm out of the centre back, and moved the front darts farther out from the centre.
By some strange quirk of my body (aka. my belly, I think!) the whole bodice tilts backwards on me. It makes the side bust darts tilt up too high, and made the neckline far, far too high! I ended up cutting the front neckline about 15cm lower, but you’d never know it to look at the pictures! At some point I should perhaps try going back to the original pattern and figuring out how to fit it better. In the meantime, I’m happy enough!
I was nervous about cutting into my fabric stash from Japan, so for this wearable muslin I used some polyester that I bough at the second hand shop instead. It’s actually great - doesn’t crease much, hangs well, kinda shiny and interesting but fairly basic! And when I happened to drop yogurt on myself during lunch, it came right off with water and didn’t leave a mark! Hurray!
The dress isn’t perfect - bra straps tend to show at the corner of the neck, and the facings at the back of the neckline can sit a little funny under a sweater. On the plus side, it’s got POCKETS! And they disappear perfectly into the side seam! I even dispensed with a zipper and just squirm into it instead.
After I finished the whole dress, it just didn’t seem quite finished… so I topstitched on a faux-belt from a beautiful Alexander Henry print. It gives the dress some definition, I think, and helps me figure out what colours to accessorize with! The print has pink, blue, cream, purple, teal and red, so I have lots of choices!
I’m working on round two right now… but here’s my problem! Having done it once, it’s kinda boring the second time around! I keep trying to dream up exciting and new modifications, when really I should just finish the darn thing and experiment with something new. Someone told me once that as an artist, the first time making something is exciting and the second time through is just boring. Do you find that too?

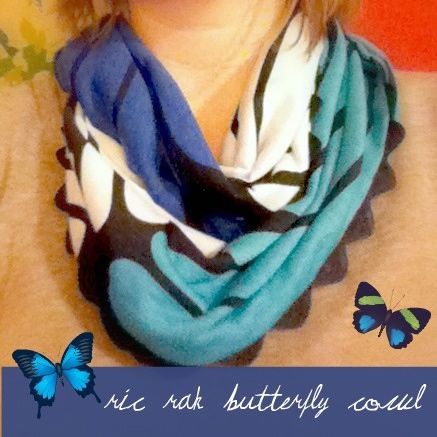
My (Not Quite) Meringue Skirt!
Our first project in the Colette Handbook Sew-Along was the Meringue skirt. It’s a pretty basic A-Line skirt, with the addition of cute scallops at the bottom. Problem is, I’m not the cute scallops kind of girl. Too much trouble to iron, I figure!
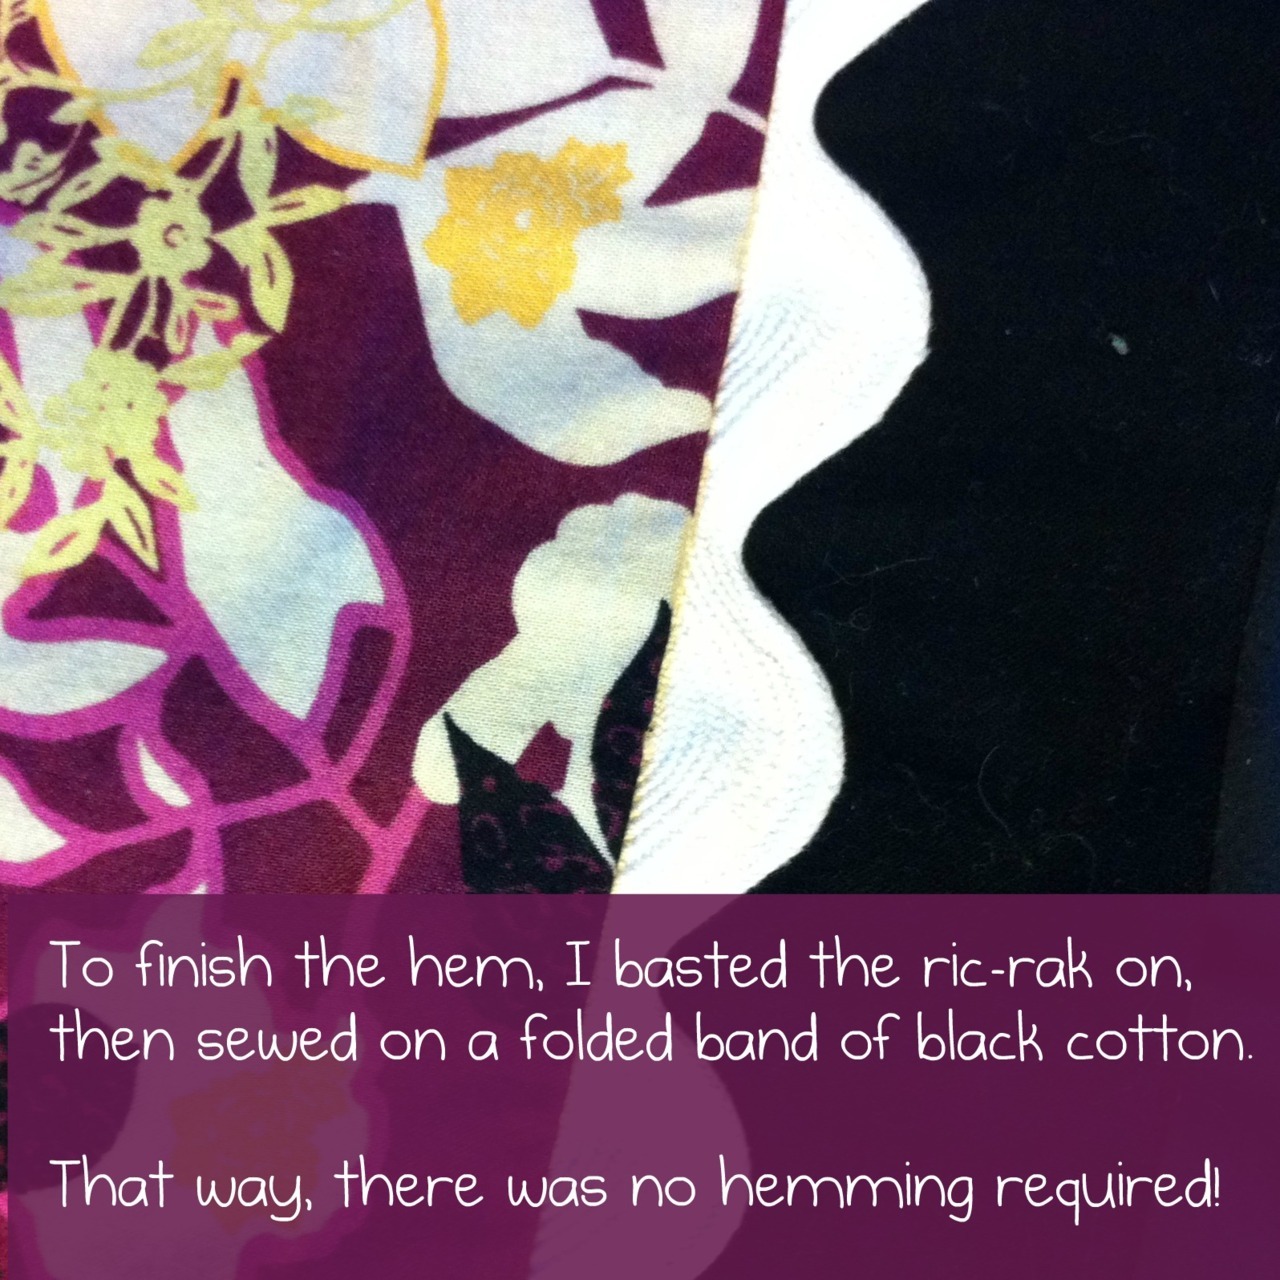
My solution was to add jumbo ric-rak at the bottom of my skirt. It keeps it fun, and echoes the original pattern, but makes for a much more practical skirt!
Even though I didn’t faithfully follow the original design, I learned a lot and feel much more confident. It’s been about 10 years since I made anything using a pattern, so this skirt really helped me get over my fears! I cut a straight size 14, and didn’t really change much after the muslin. It’s my first fully lined garment, AND my first invisible zipper. Hurray!
Other things I learned? We barely have any unadorned, unfurnished walls in our house! This little corner was the closest to a blank canvas that i could find. Also: When my husband takes a picture of me, I look waaay shorter than I do to myself in the mirror! Next time, I guess I should get him to get a lower perspective!
Get Organised: Step 1
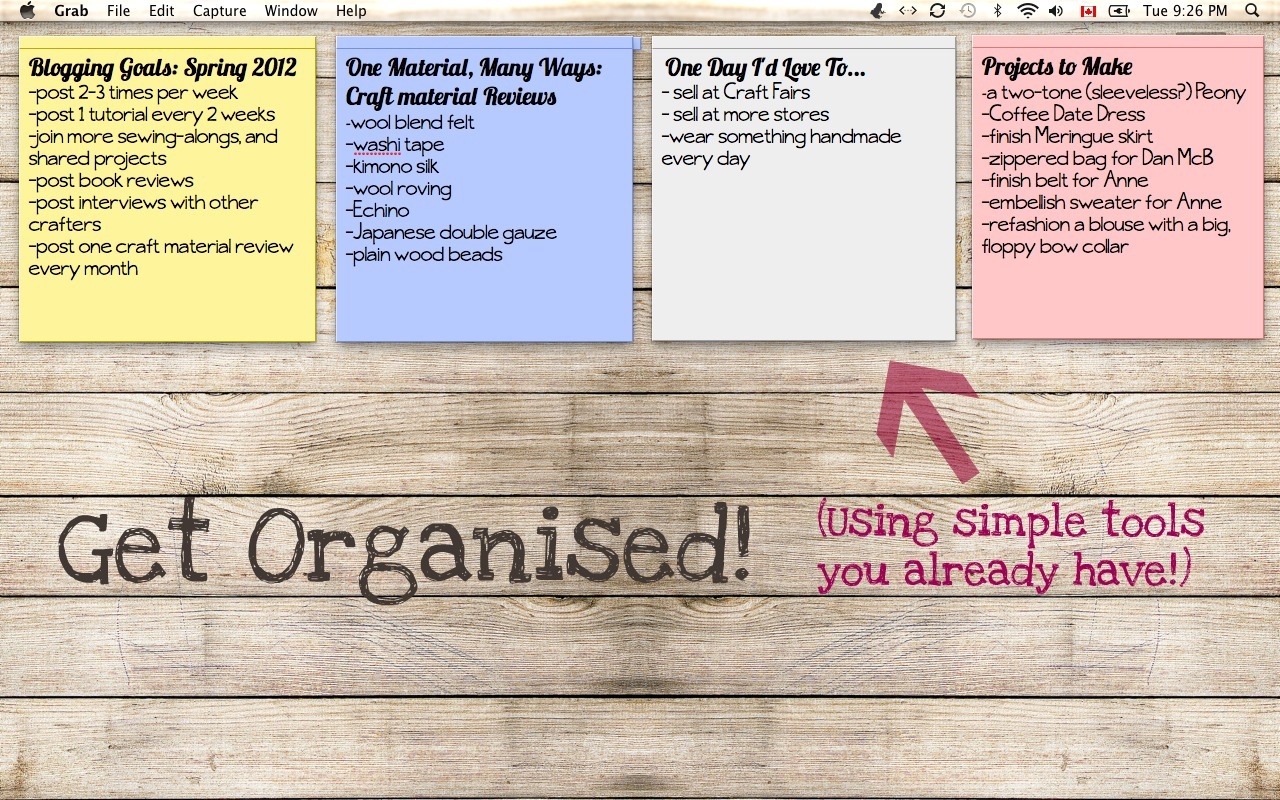
My first step in getting organised is always to spend ages thinking about all the pretty ways I could do it! Lovely notebooks, cute apps, rainbow pens… It’s a dreamy but rather impractical approach. What I really need is something flexible, easy to access and update, and something just pretty enough that I’ll enjoy using it!
Here’s screen cap of my current solution: Use the basic Stickies program that comes with every Mac, but use fonts to make it more fun. It’s free, and that’s good! I started with some basic goal setting, both for myself and for the blog… with a loose time frame and some measurable achievements. Next, some long-range plans… some blog post plans… and a to-do list for current projects! I’m sure I’ll tweak it as I go, but for now, it seems like a good start!
I’m curious how other people plan their blogs… Someone like Tasia from Sewaholic.net always seems to come up with good discussion posts every month or so. Is that a fluke, or planned?
Speaking of planning… it’s an hour before my bedtime, and I still haven’t baked a cake for my Mom’s birthday. Enough blogging - more baking! (As an added bonus, I’m hoping to watch some Downton Abbey while it’s in the oven! ;)
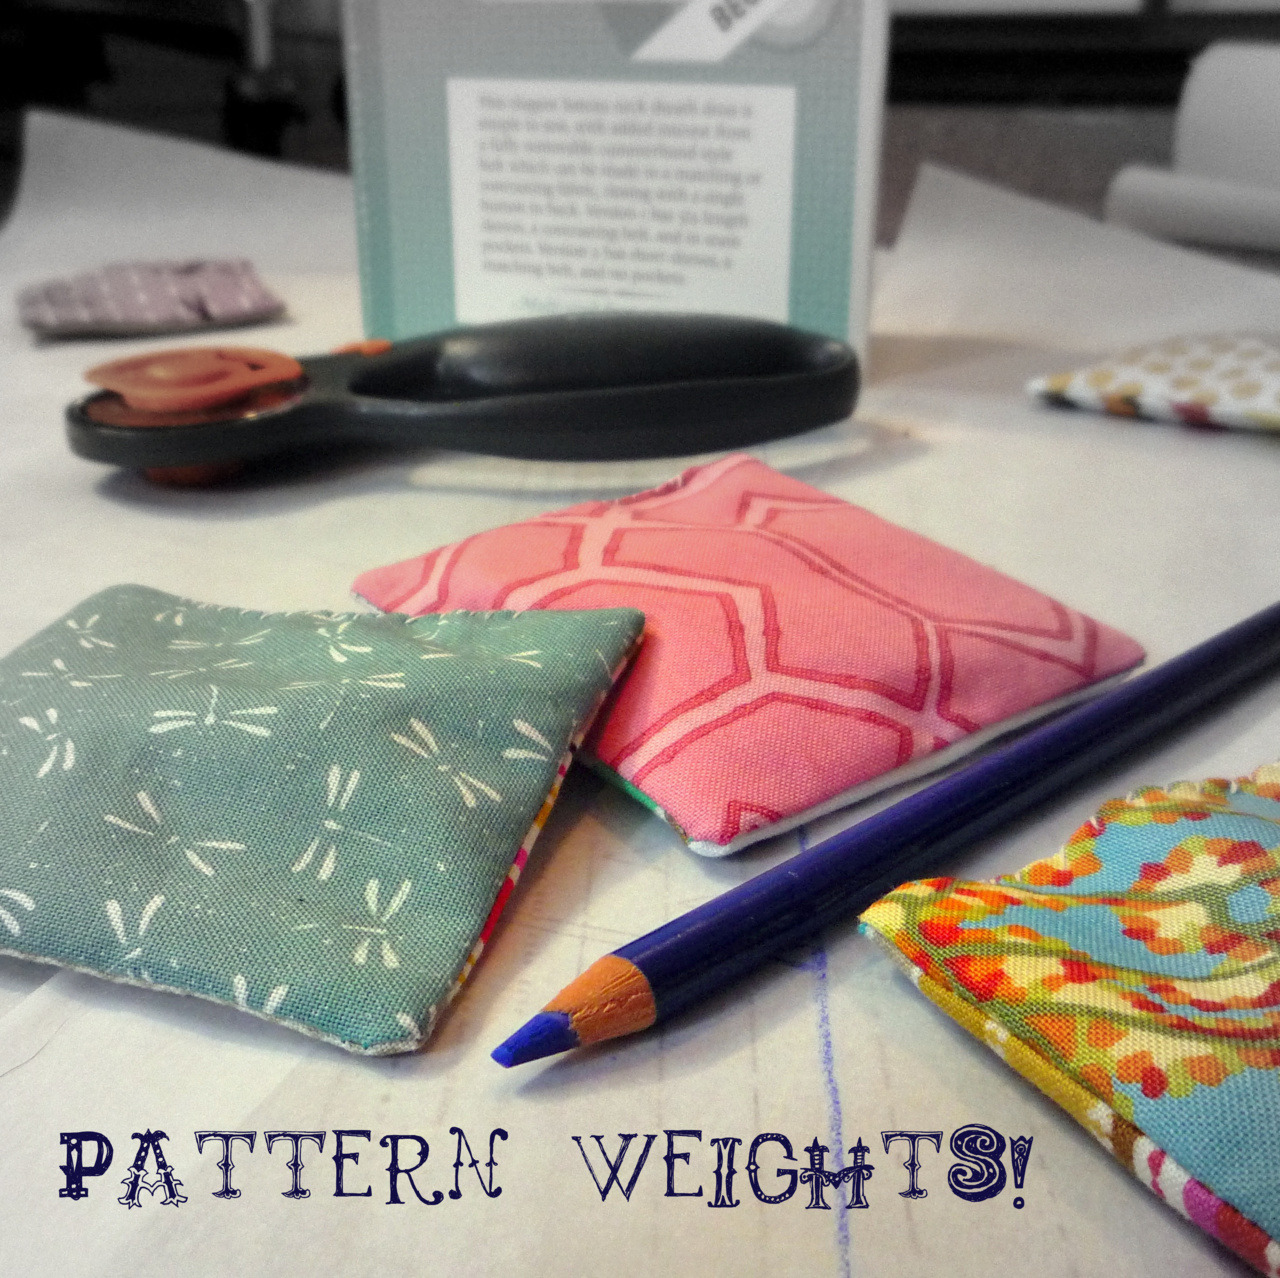
Pattern Weights: Pretty, heavy, and so useful!
I’d never even heard of pattern weights until this year - but wow, they make cutting out patterns so easy if you have a rotary cutter and a self-healing mat! Just lay out the fabric, put the pattern on top, and use the pattern weights to hold everything in place as you cut with the blade! I’d always wondered how people traced patterns without making all sorts of mistakes as the tracing paper and pattern tissue slide around… and these are clearly the answer.
Until recently, I’d been using a collection of nails, jars, rolls of masking tape, and even some silver polish to weight down fabrics… but when my silver polish started leaking onto fabric, I knew it was time to upgrade!
I’ve seen a few tutorials around, like Elizabeth Hartman’s 50 cent Pattern Weights at Oh Fransson, and these ribbon-wrapped washers at SewWhitney. I decided to go for a hybrid version: Basically, a beanbag filled with 6 heavy washers! I made 6 little beanbags, which seems to be enough to hold most patterns in place.
Better yet, with the help of these little babies, I made my first dress this week! A much altered Colette Peony… Pictures to follow eventually!
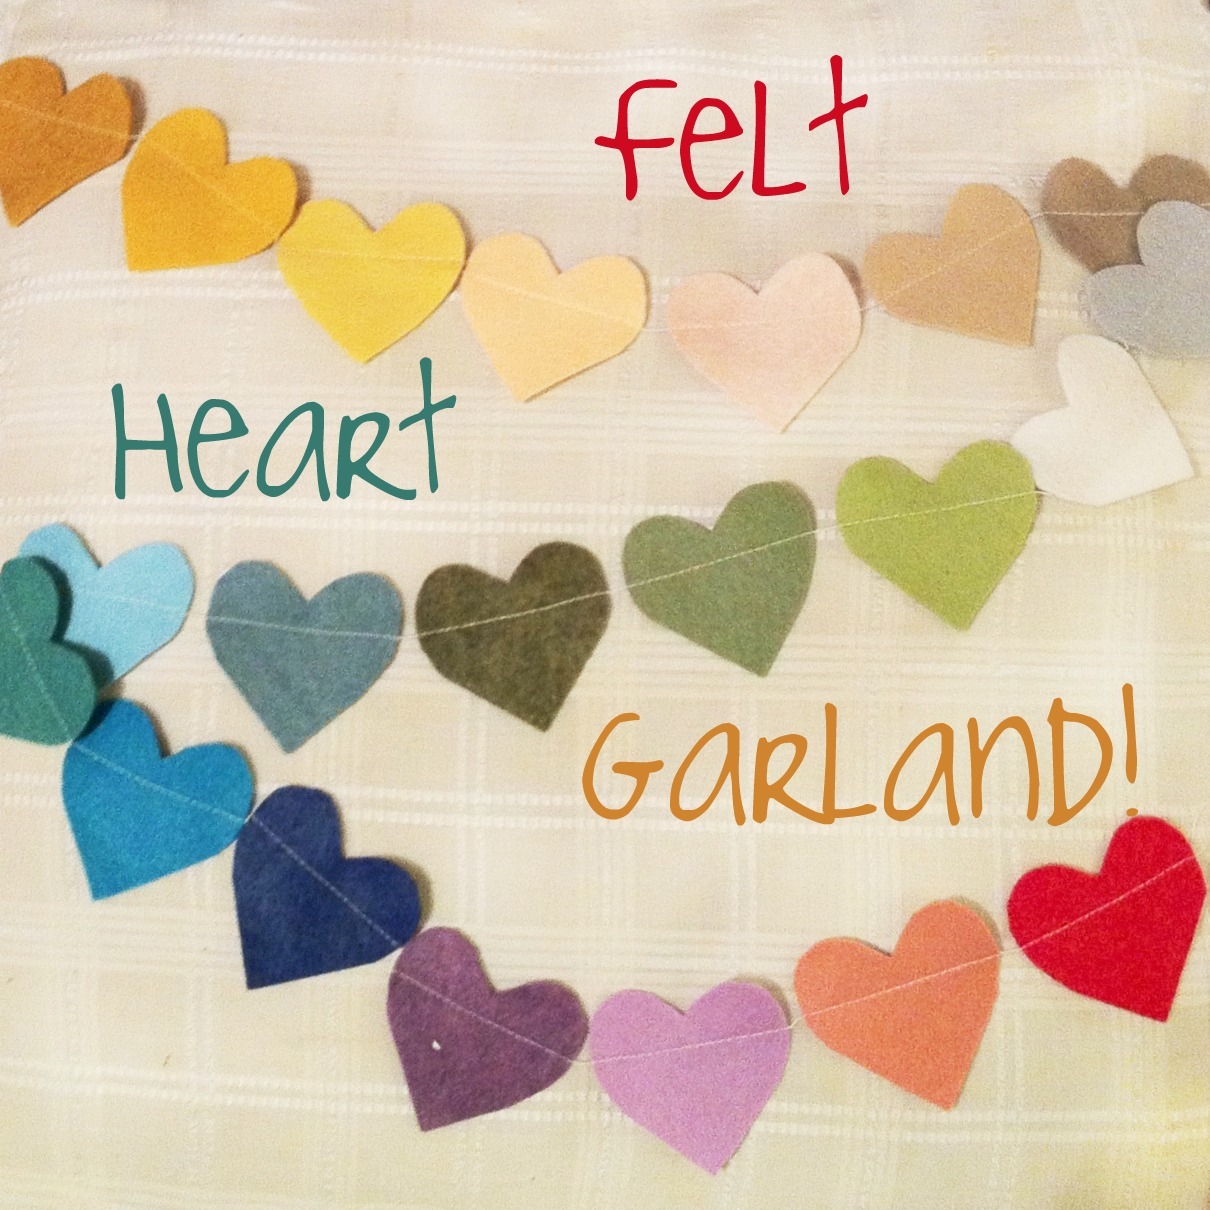
Felt Heart Garland
It’s almost Valentines! It’s not really a big holiday for adults these days (though it is the day J and I had our first date!), but it’s huge for Elementary kids and the Japanese! I was looking for an excuse to play with felt the other night, so I cut out this rainbow of heart from my newest felt stash. (Seriously guys, it’s all about the rainbow. !t makes everything better!) My friend’s cat was so fascinated by the felt that I ended up making a felt cat toy too!

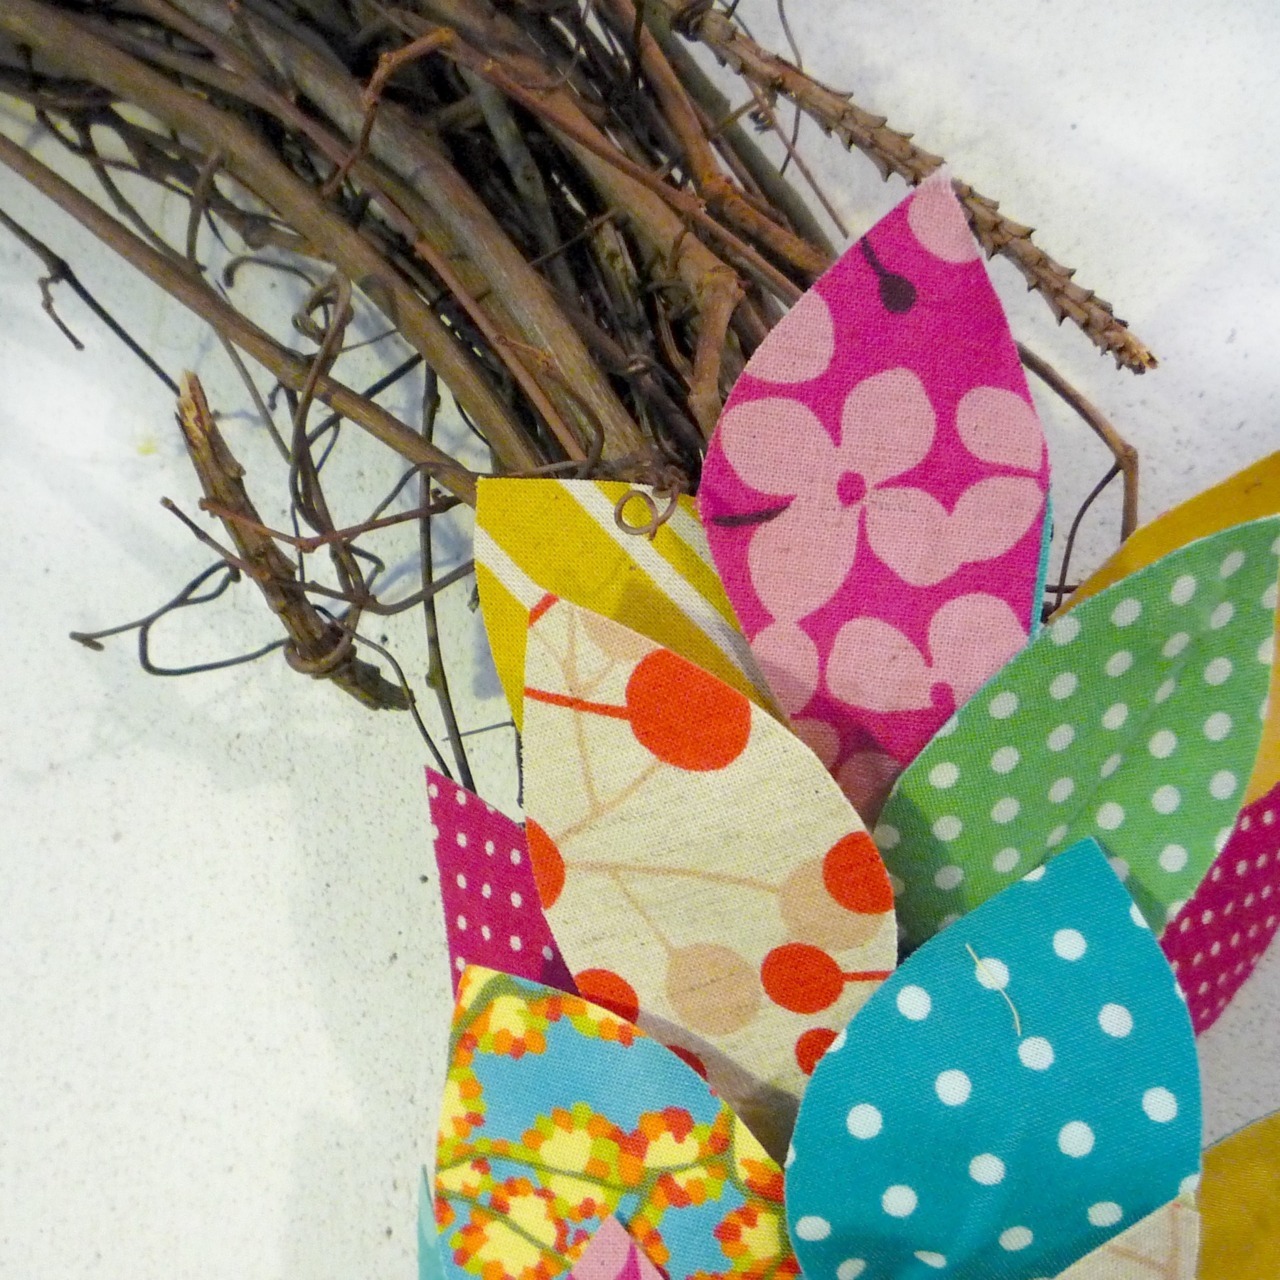
Spring Wreath
I’ve been dreaming this one up for a while… It’s inspired by this beautiful paper-and-twig arrangement that I pinned a while ago from “Two Girls Being Crafty”, but instead of paper, I used fabric, and instead of branches, I used a grapevine wreath!
I used a gorgeous bright Echino stripe as the basis for the colour scheme, and mixed in other bits and pieces from my stash. Each leaf is made with two layers of fabric sandwiching a layer of interfacing and a flexible floral wire. Not sure what to do with it now that I’ve made it, but for now it will cheer up my sewing area!
Gifts, both good and bad!
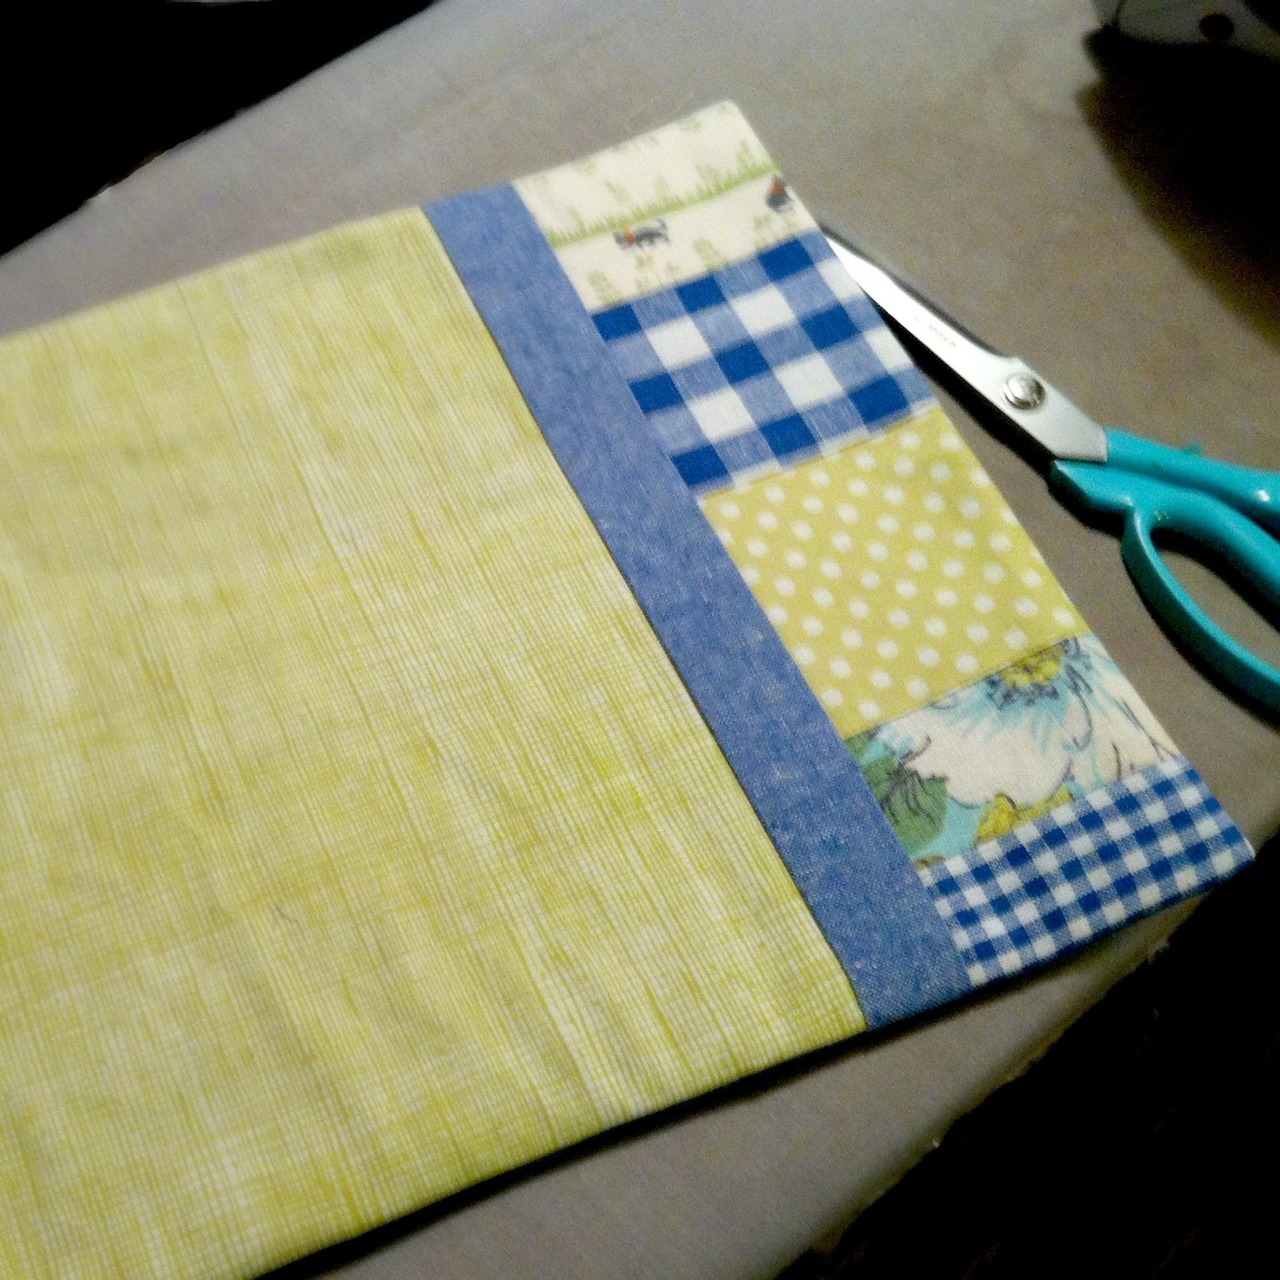
Last weekend I was busy sewing gifts - and here they are! For Anne and Dan, a semi-successful set of patchwork placemats, and for Jamie, a collection of totally failed coin purses!
Somehow this is the only photo I have of the placemats! (Anne, help?) I picked out pale green and blue fabrics from my stash, and had fun trying to channel Japanese Zakka-style (cute but calm handmade) in the piecing. Each placemat is different. Unfortunately, I’d forgotten to prewash three of the 10 fabrics, and lo and behold, they shrank in the wash! The backing is now all bubbly and loose, since it was made out of a well-washed used bedsheet. It stayed big while the front patchwork shrank! Darn. Oh well. I still like the overall look!
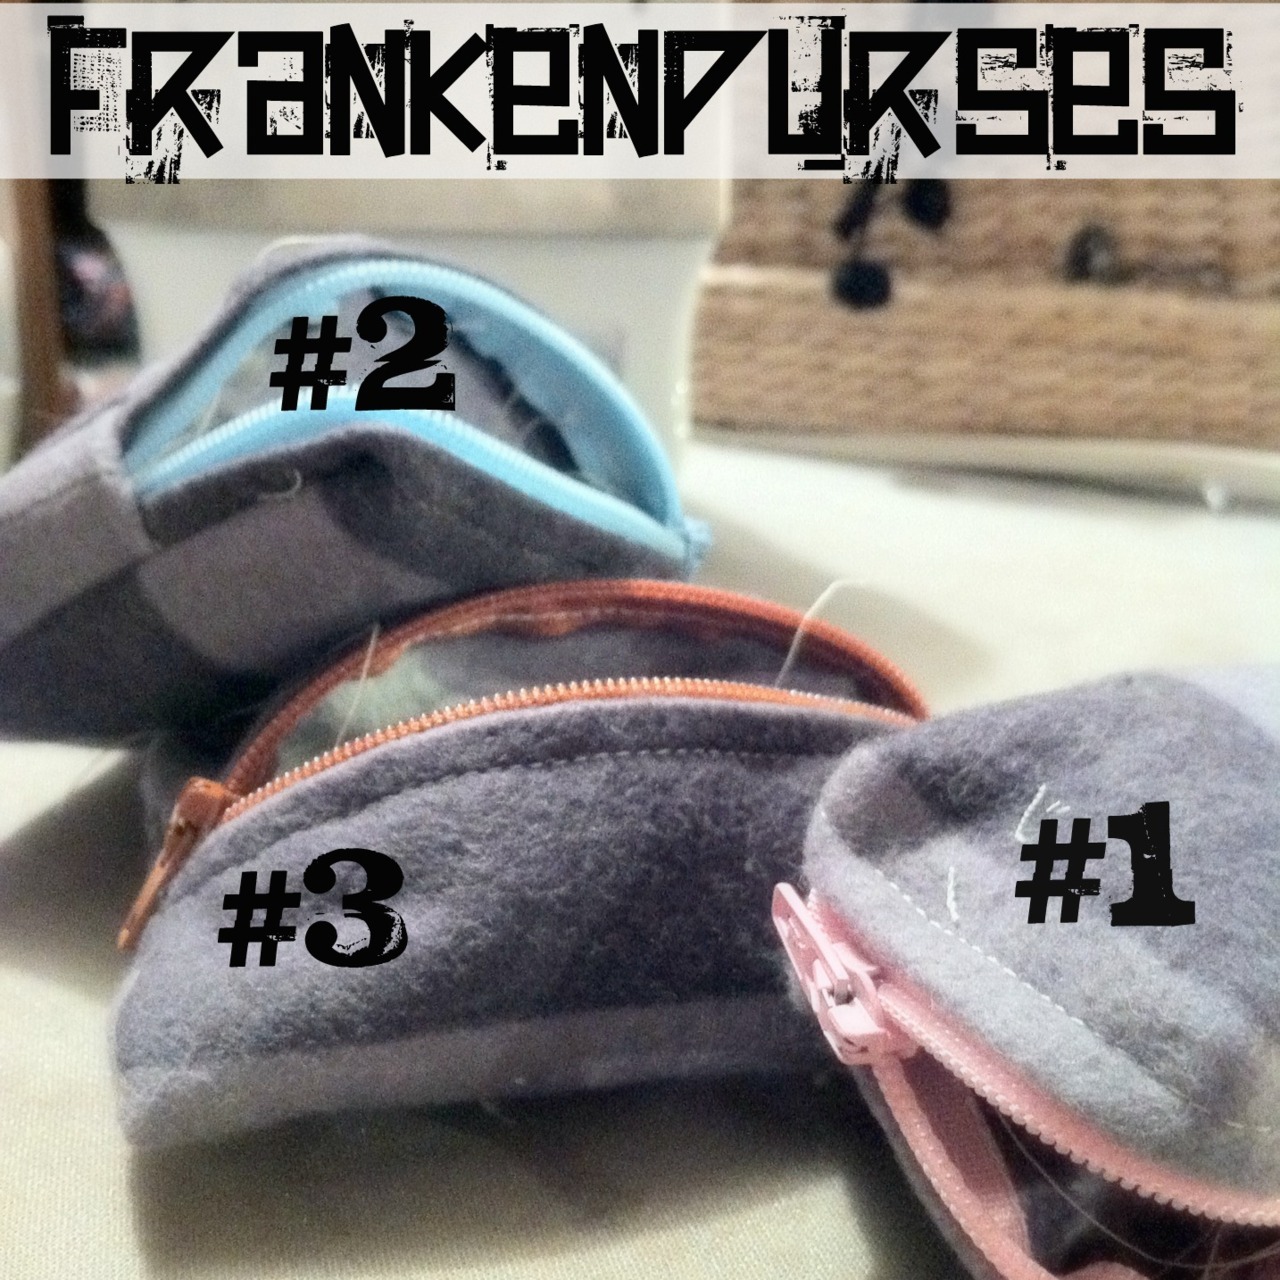
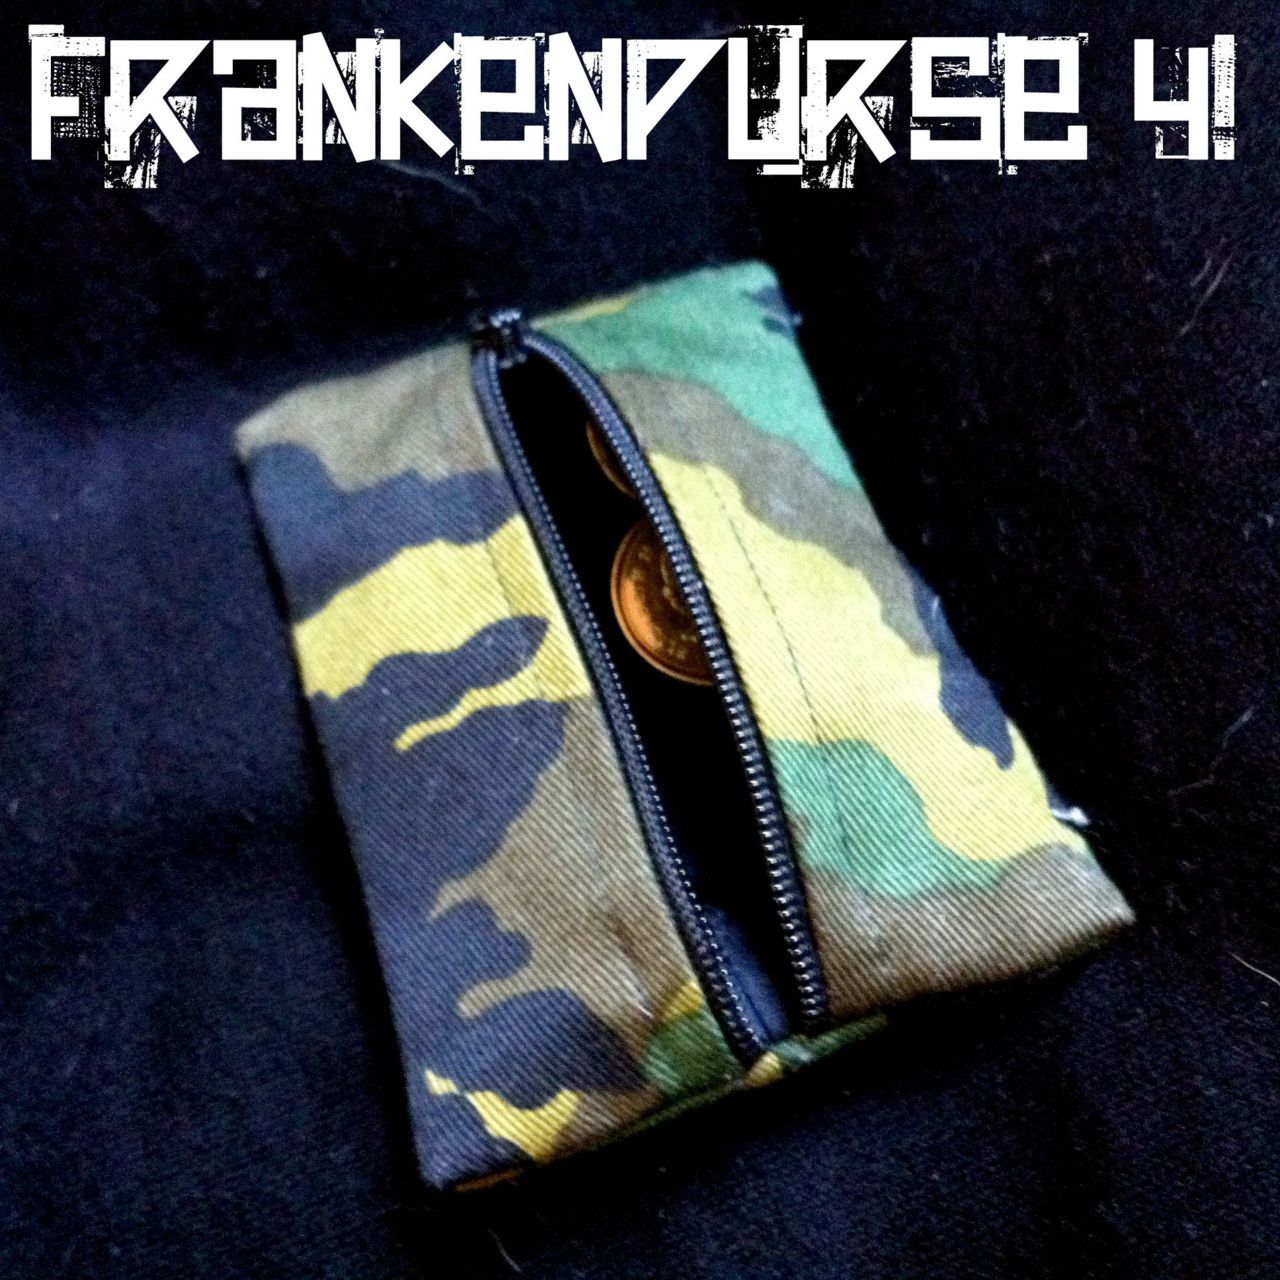
Jamie’s coin purses… oh my. He’d asked if I could revamp or remake his Japanese Astroboy coin purse for his birthday, so one night while he was out, I dutifully tried to figure out how it was made! I knew it would take a few tries, so I started with ugly fabric and garish zippers… but I never thought it would be so hard! After two tries, and much internet tutorial searching, I gave up on recreating his previous coin purse… and moved on to something simpler. It was figuring out how to line everything that really messed me up! Version three was a reasonable mock-up, on my 4th try I made something more usable. He’s trying out the design, and if it works, I might make a sixth and final draft!

I haven’t been posting much lately, but I swear I’ve been sewing most nights!
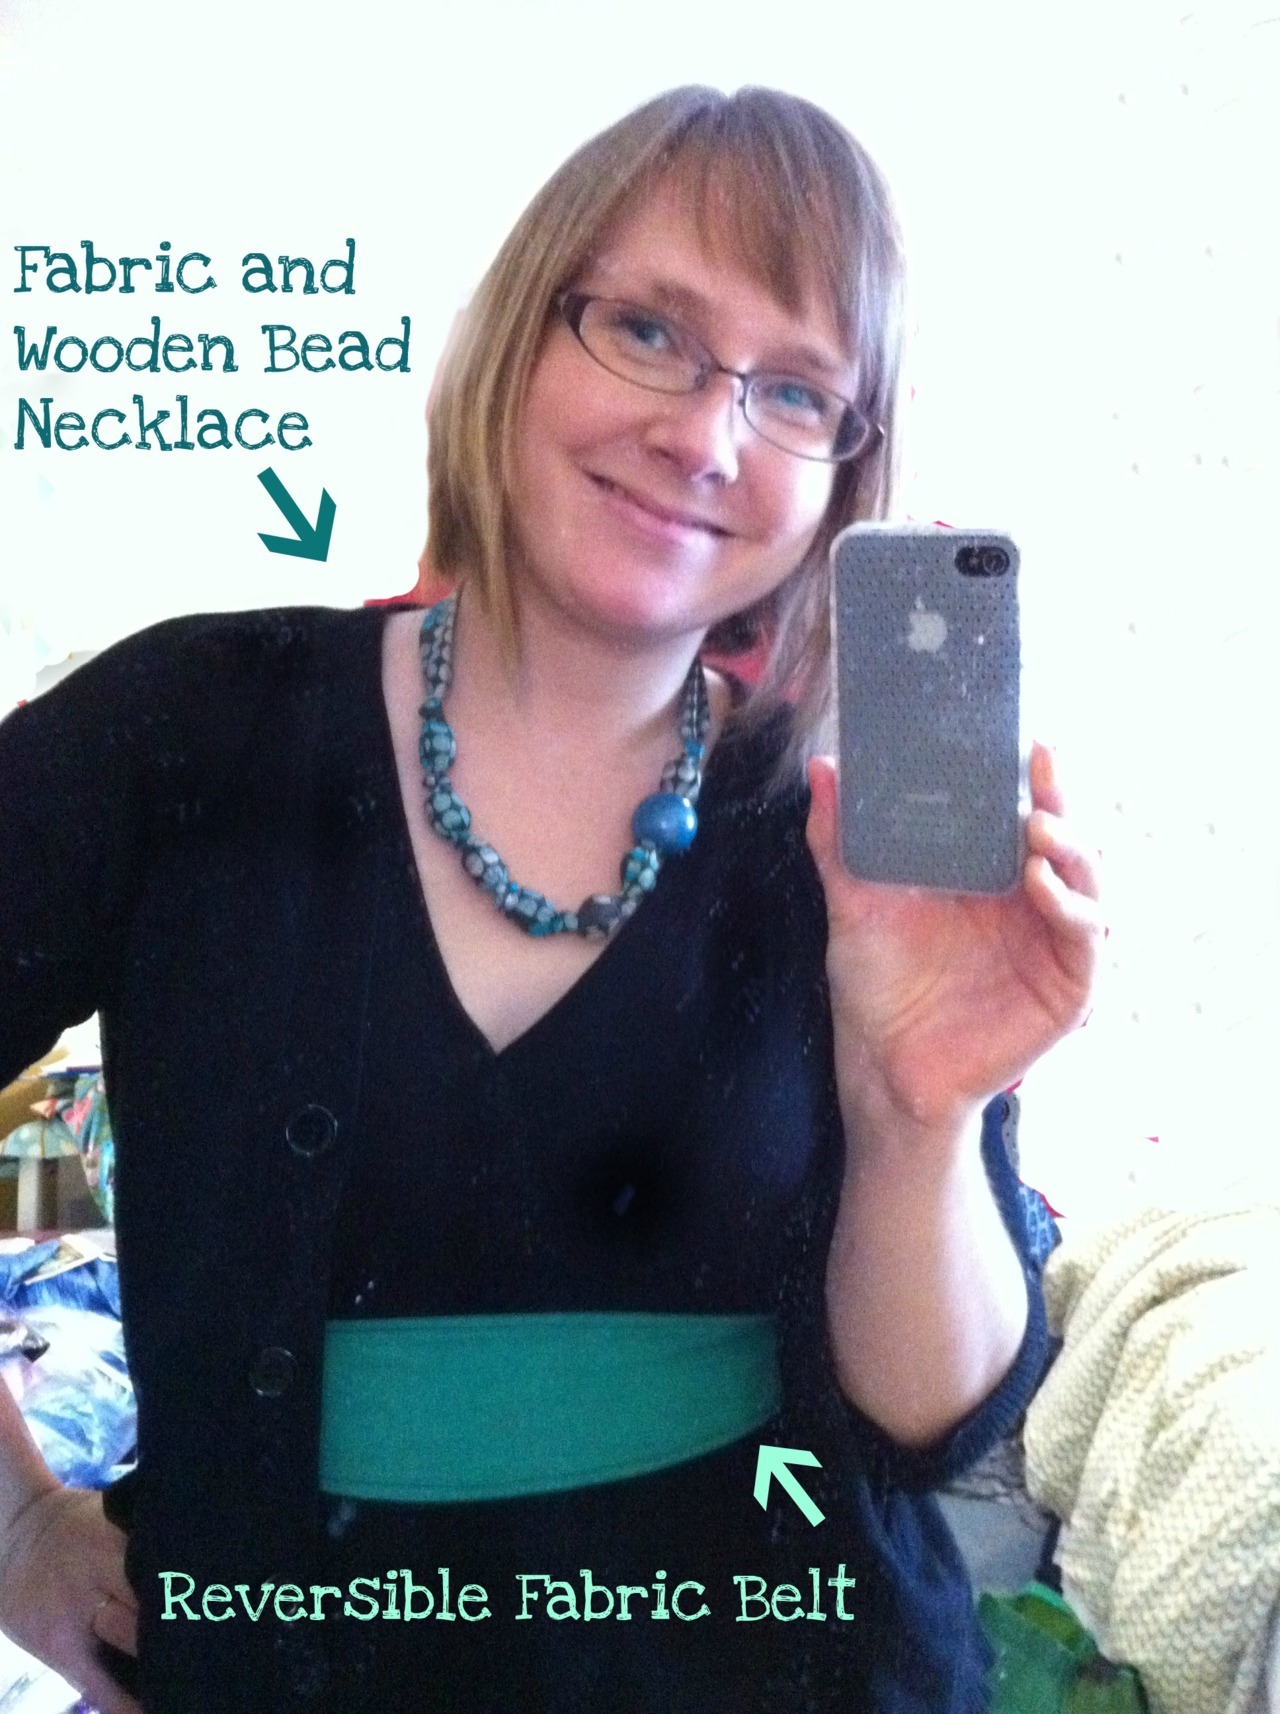
Since Christmas, I’ve been trying to wear something handmade almost every day. In an ideal world, that would include perfectly-fitted retro dresses made by me… but in real life, it’s usually necklaces, scarves, pins, and belts! My sister and BIL had a housewarming party last weekend, so I was motivated to whip up some colourful handmade goodies for myself. The beauty of making accessories is that they only take half an hour to finish!
The belt is black on one side, so that I can wear it with patterned dresses and tops… but the fun side is tis lovely emerald green cotton. I bought 10m (Yes, ten metres!) in Japan for $1/m, thinking we could use it for wedding decorating… so this belt barely made a dint! The necklace uses just a thin strip of lovely lightweight cotton voile, also from Japan. I have enough to make a dress out of, I think… Just not quite sure how it will look as a whole garment!


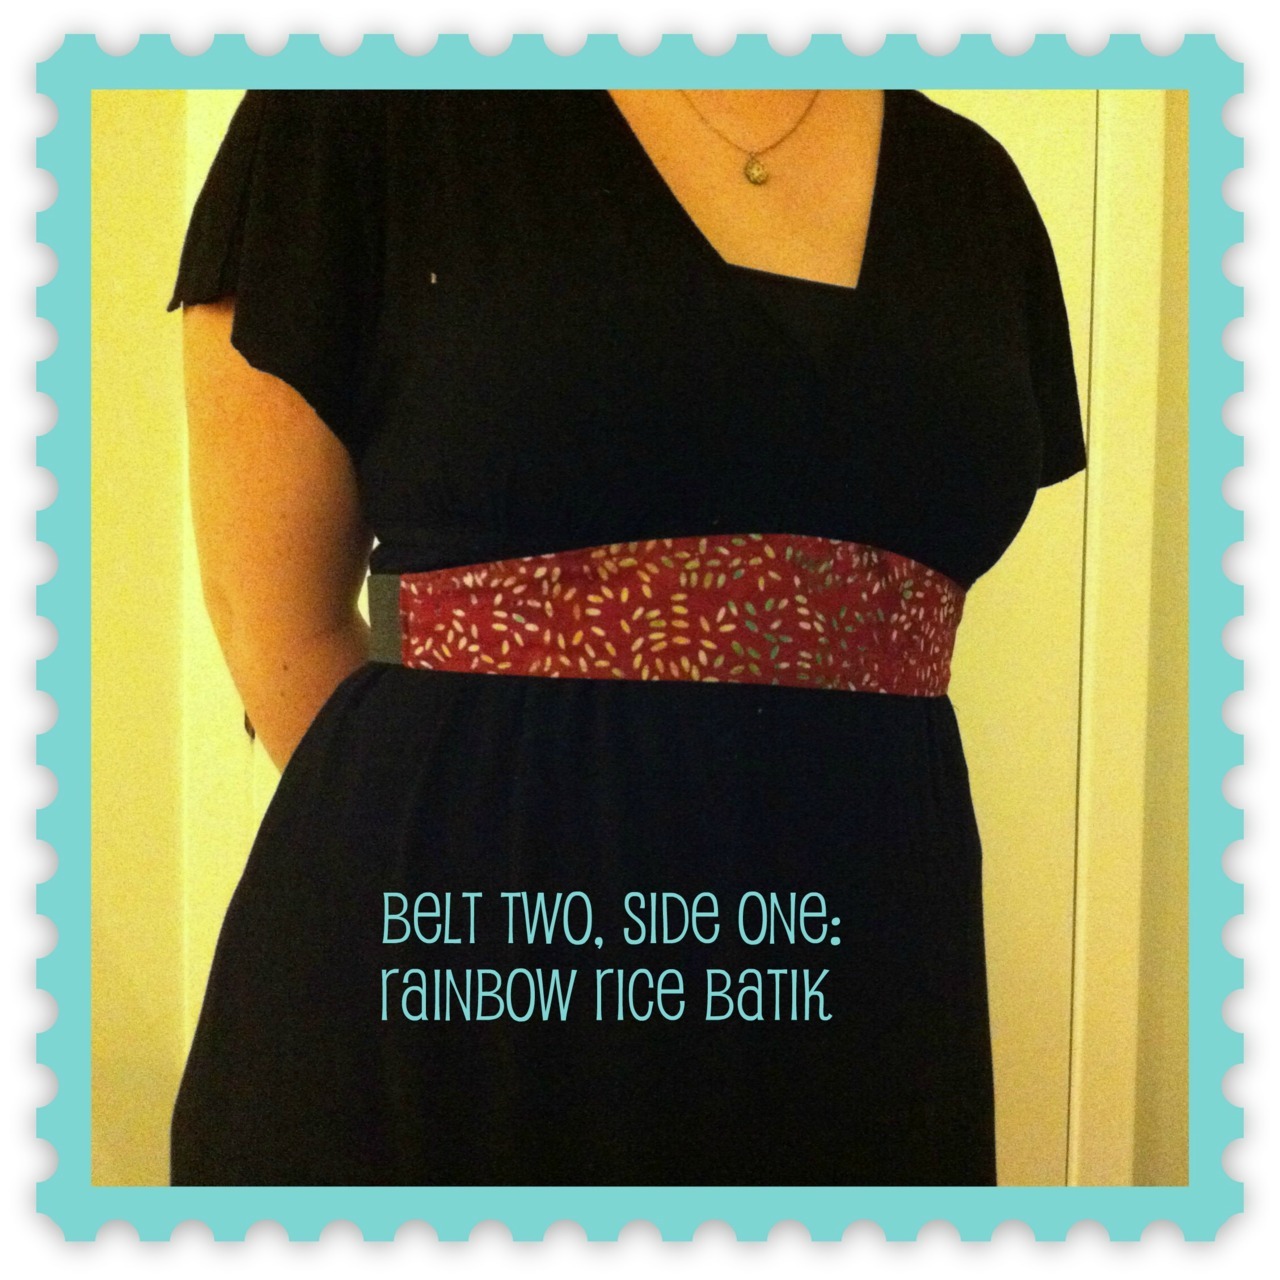
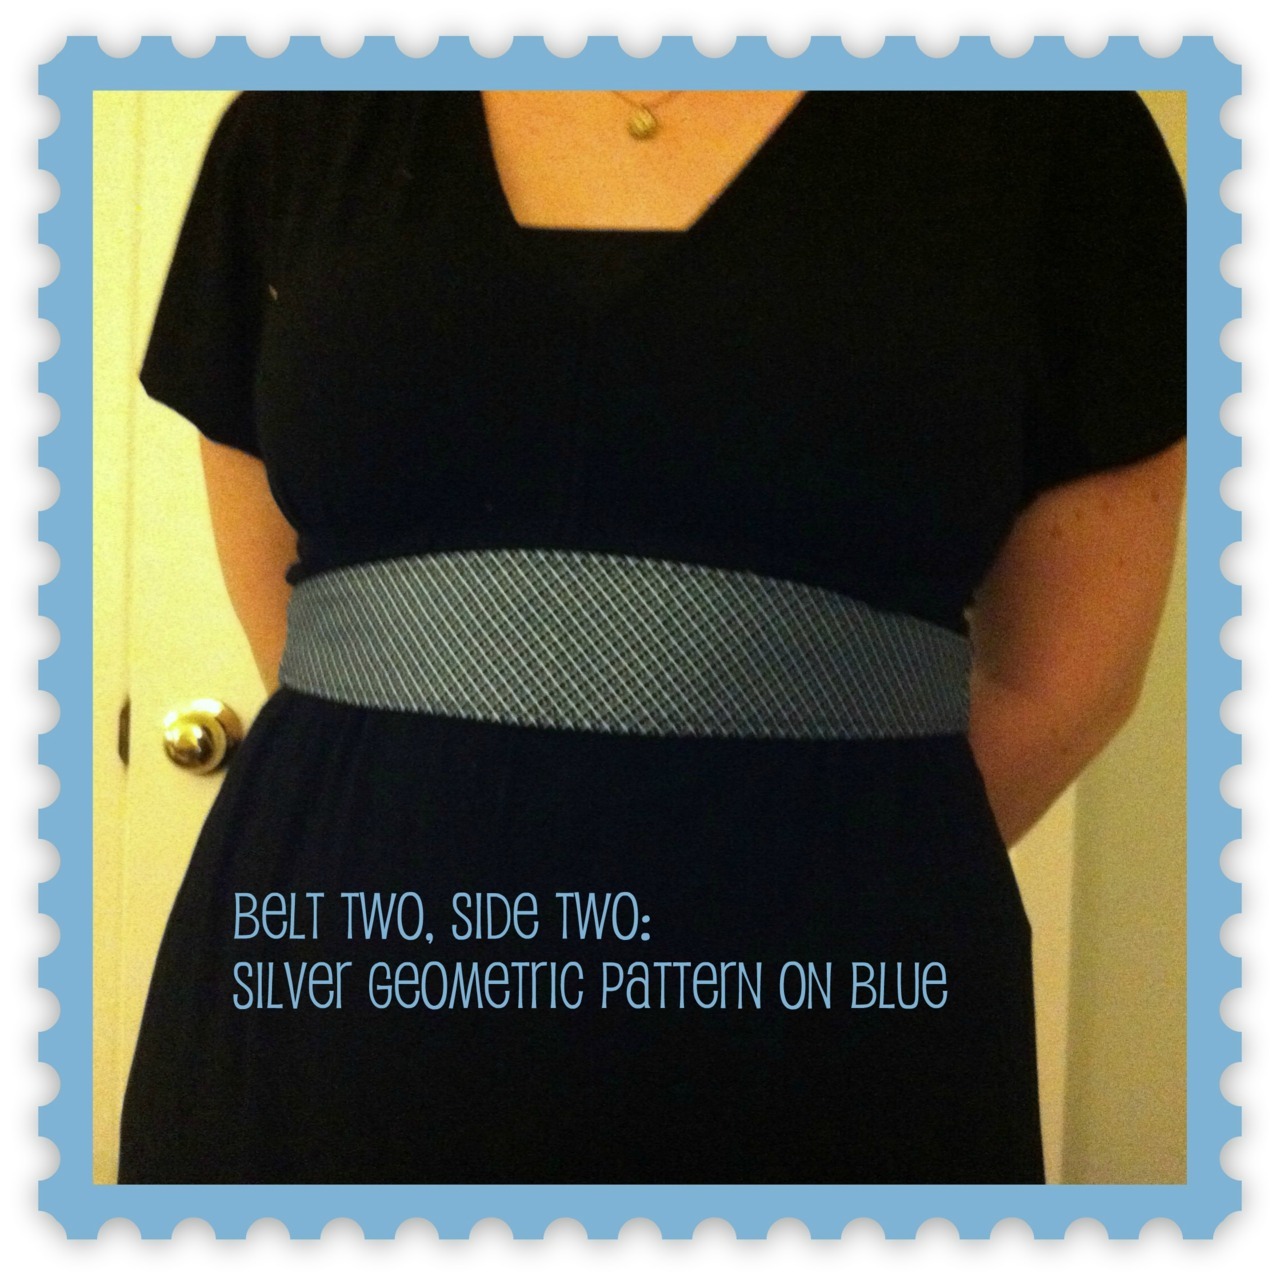
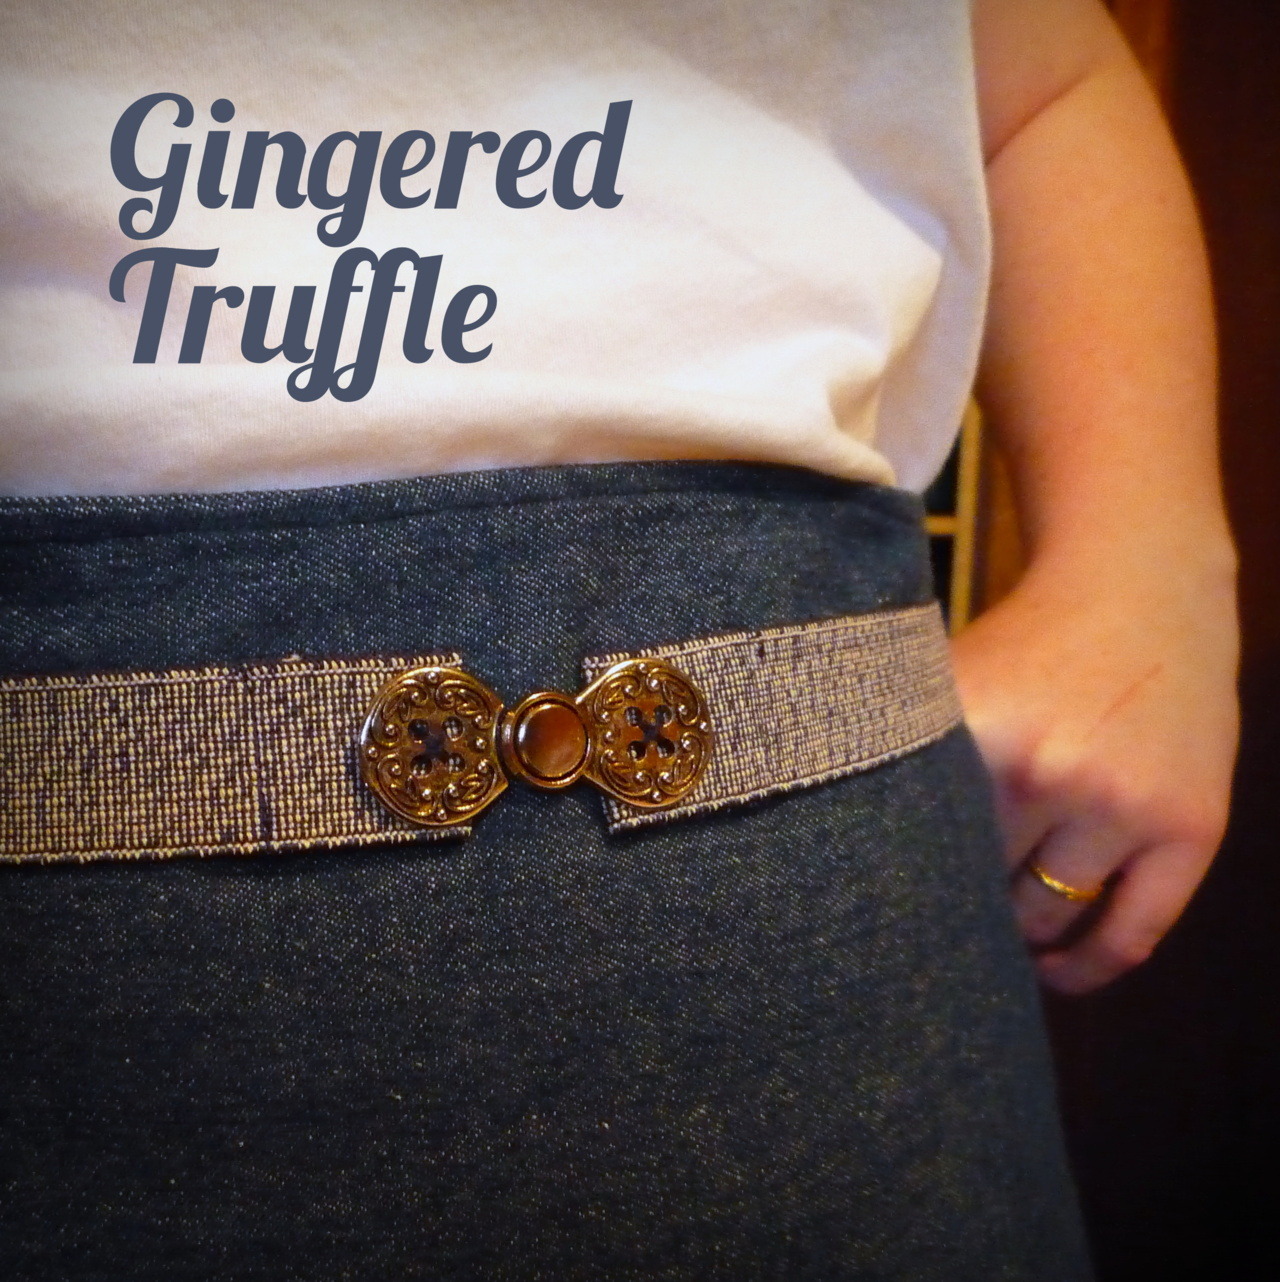
Reversible Stretchy Belt!
I love the look of wide belts, but I’ve never found one that was both CUTE and COMFORTABLE! I want to be able to breathe, dammit, without the belt being so loose that it falls down. Tonight I had a brainwave, and I think it turned out pretty well! I made a reversible front section from fabric (with interfacing, so it doesn’t roll up or get slouchy), and added a piece of elastic to go around the back. You have to sort of shimmy into it by pulling it down over your head and shoulders. I love that it’s reversible and really showcases the fabric! I made them to wear with jersey dresses, mostly, but I think they’d work well with all kinds of tops. Also, I totally want to stick a brooch on them! Now the big question: Do I dare wear one for an interview tomorrow, or should I go more… classy?

Blurry pictures will just have to do!
We had a wonderful, busy weekend. J and I drove from city to city (fabric store to fabric store, really) yesterday and I stocked up on all sorts of goodies. Today I did some prep for school and spent a few hours crafting… and got a call for a second interview this week! Yippee!!!
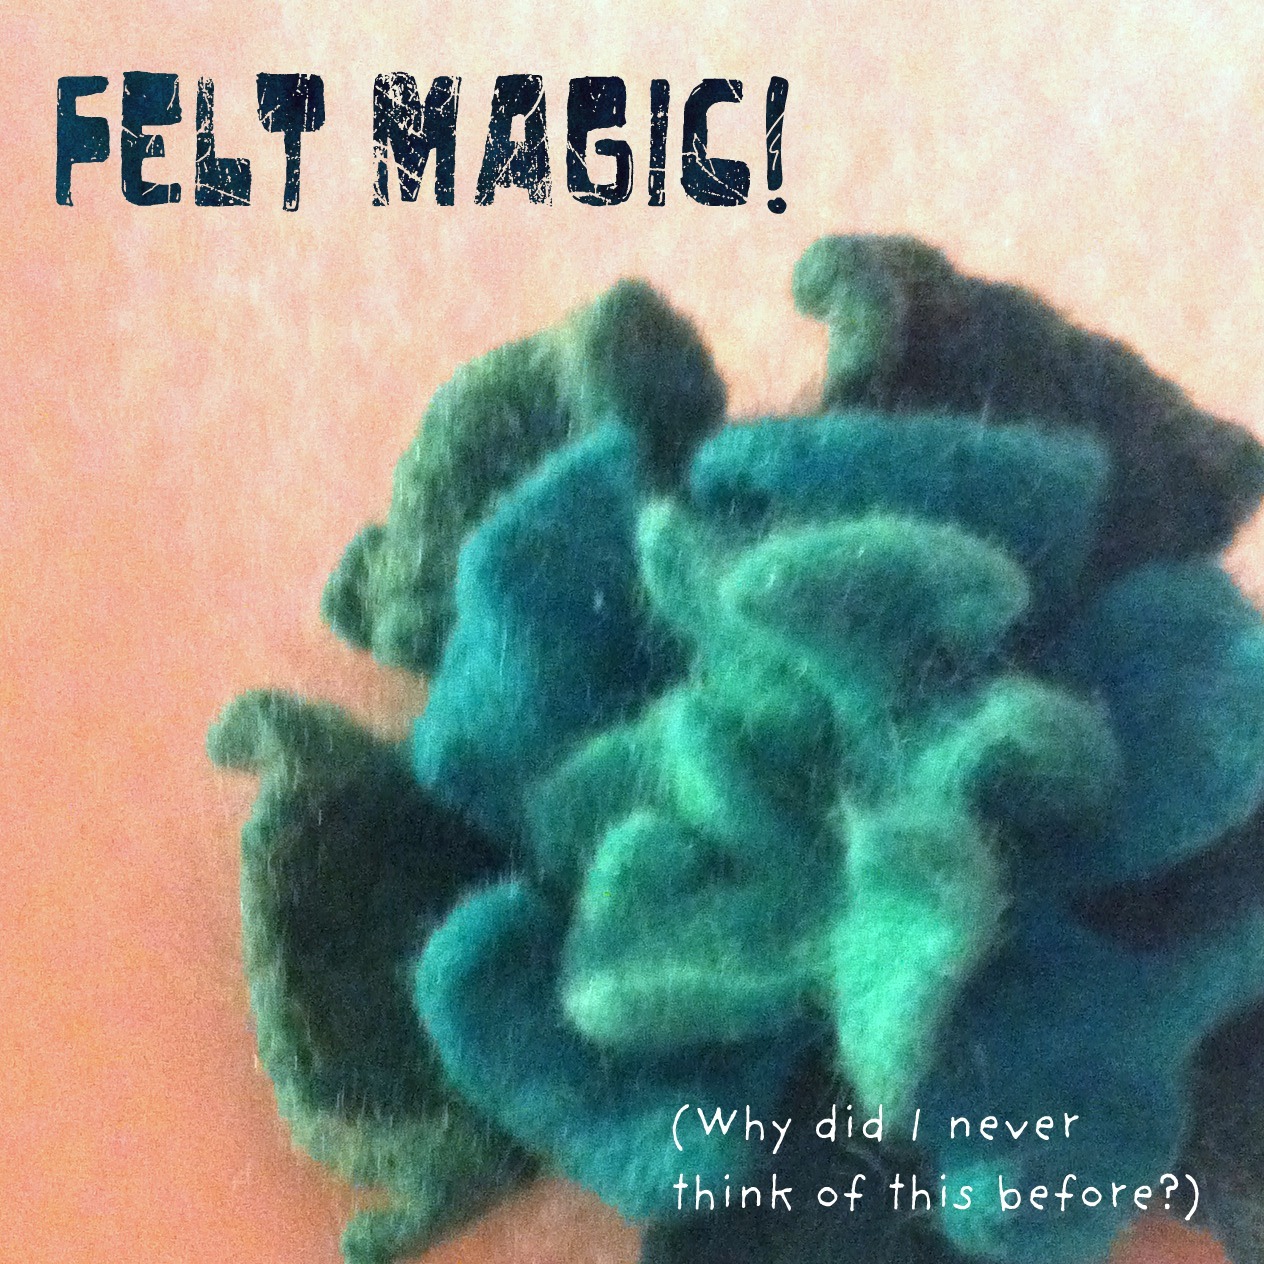
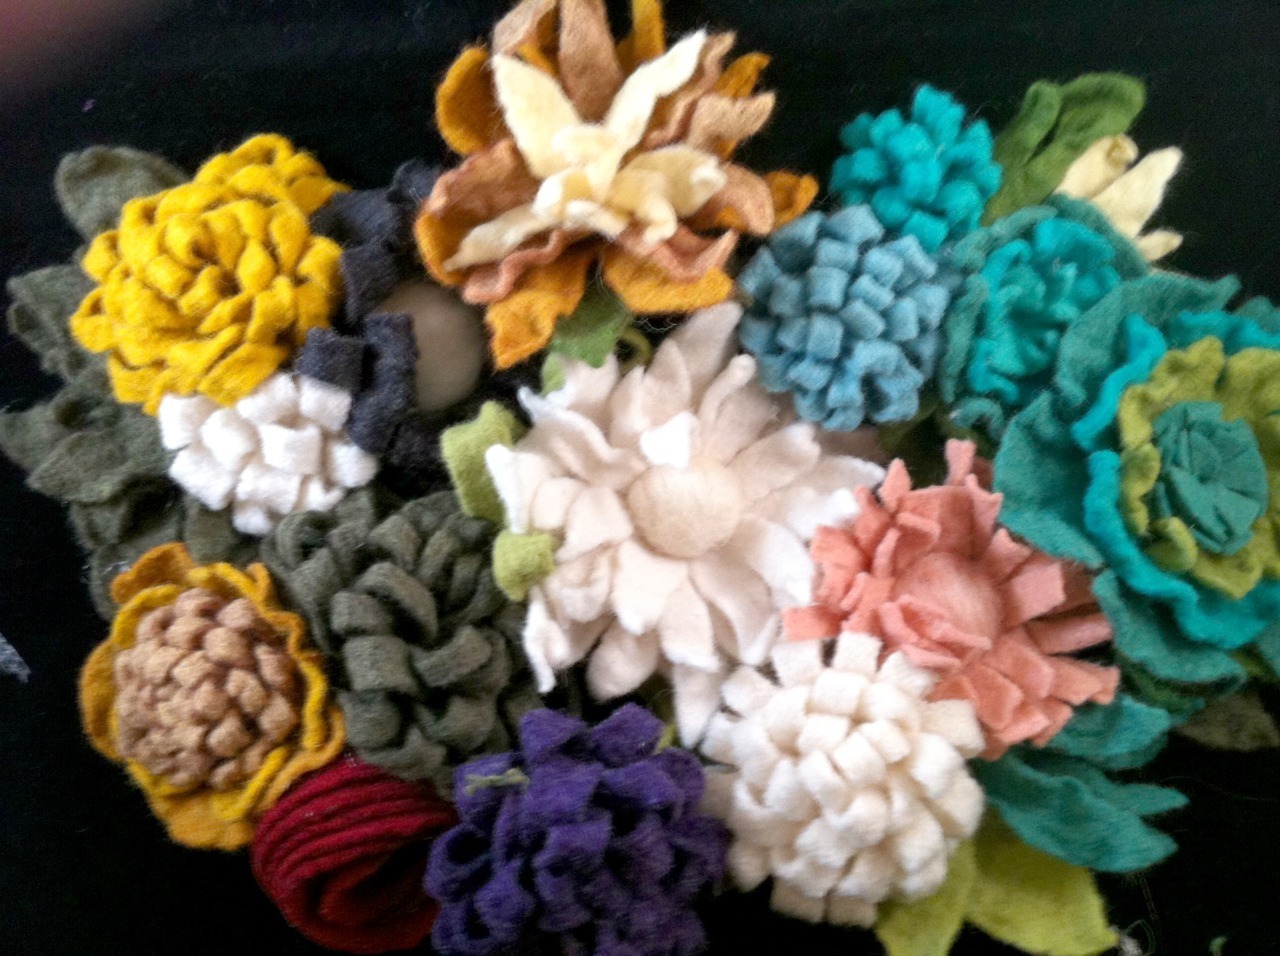
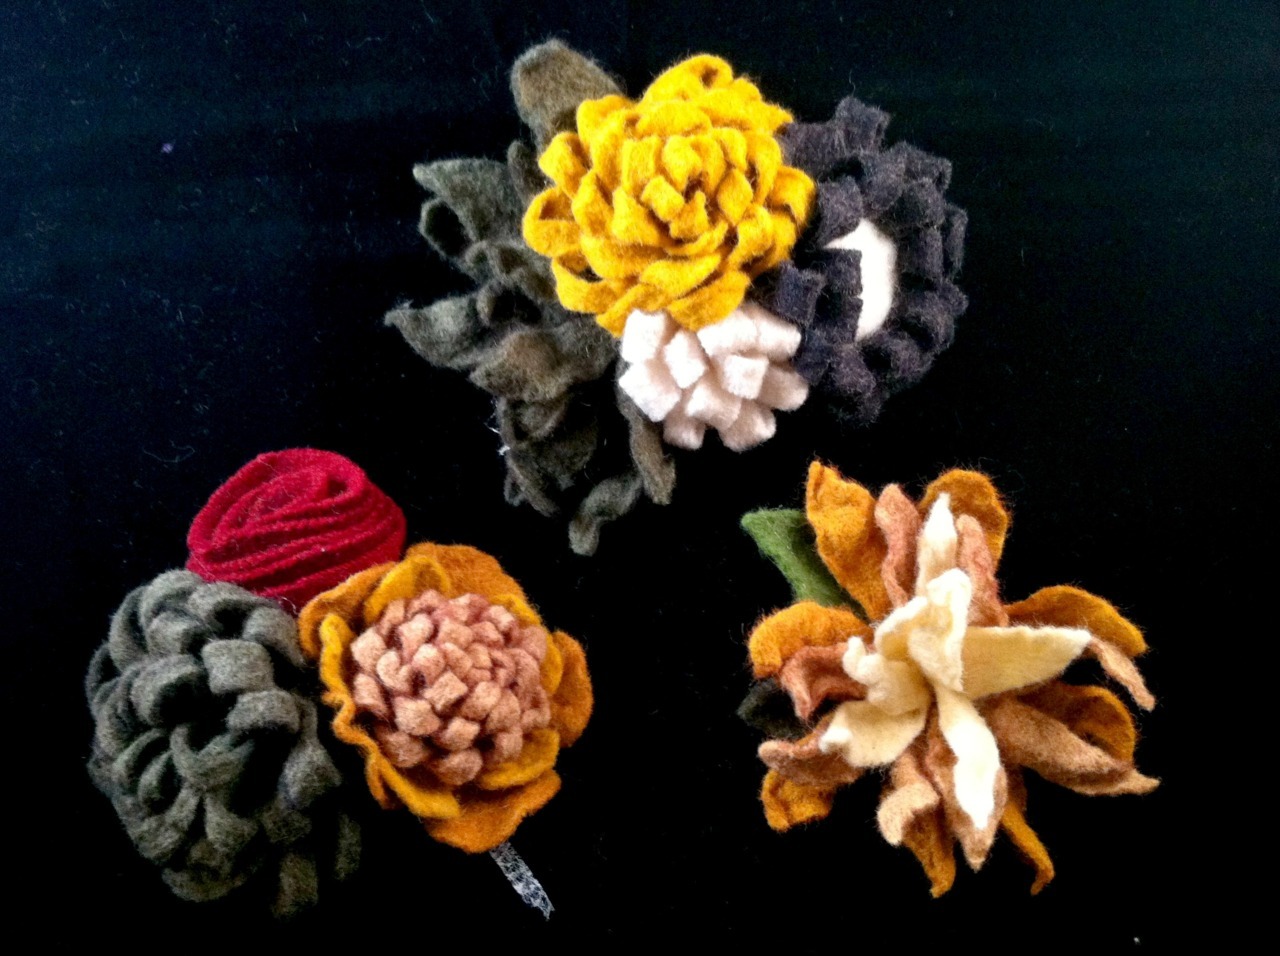
Amongst all that, I’m happy to just accept blurry pictures. Sanity wins over perfectionism, right? I’m really happy with this batch of felt brooches, even though they don’t actually have pins on them yet. It was really fun to figure out which shapes of flowers work well together, and neat to see my colour schemes in action. Very addictive!
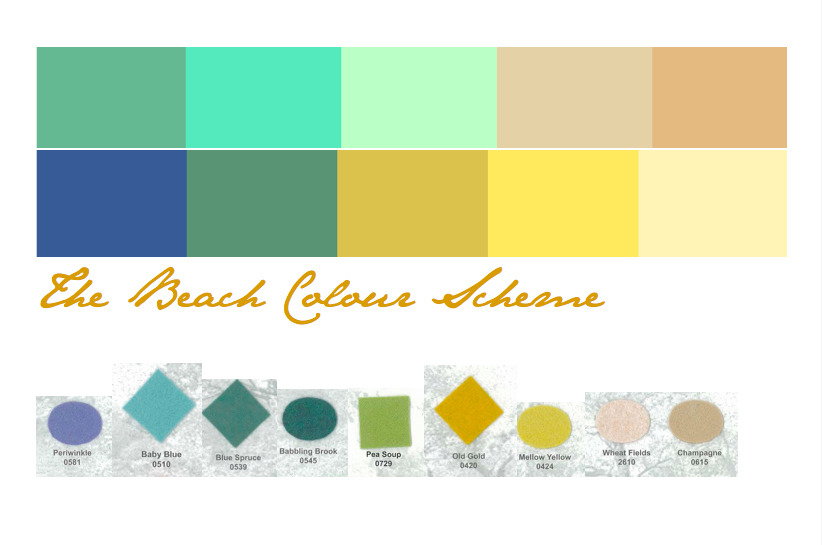

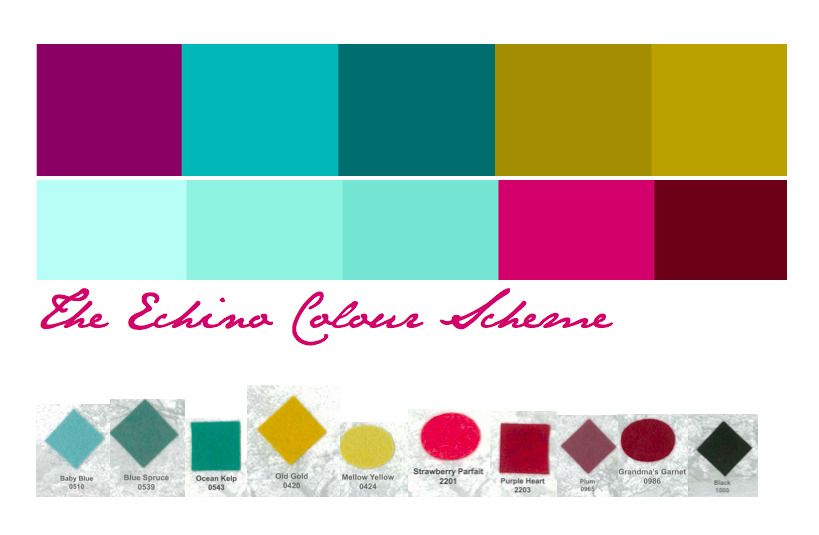

This is what colour nerds do.
Seriously, I stayed up way late for this, and woke up just wanting to gaze at the pretties!
I’ve been thinking a lot about colour combos lately, and how to make the bright saturated colours I love a little more… palatable for felt brooches. I love red, yellow, blue and turquoise, but it’s too much for even me when they are all together in one flower.
I started looking through online colour scheme generators, and pulling the ones I loved into a Pages document. I was really pleased to find that the ones I choose all fit into one of the four groups above, which all have some very similar tones of turquoise and mustard yellow! I don’t naturally go for neutrals, but in most of the colour schemes above, it’s the taupe or grey that really pulls it together. A good lesson for me, I think! (Anne, are you hearing this??!? I am singing the praise of NEUTRALS!!!! Ha!)
The final step was the slowest - Pulling swatches of wool-blend felt to match the colour schemes. I’m really happy with the result, and my felt order is going to much more targeted as a result. No ugly colours on a whim - Just colours I can combine in many ways! My fingers are itching to get started!