Friday, October 25, 2013

Join the Grand River Sewcialist Group! (If you live near me, that is!)


As you know, I’ve recently moved to a new city - Guelph (pronounced “Gwelf”), to be precise!


I know there is a lot of interest in sewing here! In our small city, since we’ve got a nice selection of shops and learning spaces: 


There’s an active Knit Night here, held at All Strung Out, and a strong community of knitters… but a sad lack of an organised sewing community! (OK, I’m new - Maybe I’m missing something, so if I am, please fill me in!) 


To get things going, I’ve started a new Facebook group for local Sewists* from the Guelph and Kitchener Waterloo area. If you live anywhere close and are interested in sewing, please join! It’s not just for people who blog or tweet - everyone is welcome!


facebook logo 1You can find us on Facebook as the Grand River Sewcialists


If you happen to know a sewcialist**  please spread the word! 


For those of you too far afield to join our little group, how have you connected with other sewists locally? Is there anyone near you on the Sewintists Map


*Sewist: Someone who sews, aka. a sewer! It’s how we get around the pesky problem of sounding like we’re calling ourselves a conduit for sewage when we write online! 


**Sewcialist: someone who sews and uses social media like Facebook, Twitter, IG, etc to connect with other sewing fanatics. Find out more at sewcialists.org, and even make your own version of the logo above!

Wednesday, October 23, 2013

The Sewcialists made me do it!

Where would Sewists be without the internet? Without Pinterest, I never would have thought of printing my own polkadot pants… and without the Sewcialists on hand to enable me, I never would have found the courage to actually do it! 


Thank to the internet though, I am now the proud creator of these polkadot pants:


Polka Dot Pants!


I started off by testing black and white polka dots on my fabric, to see which I like. I went with the black on dark grey because it seemed more wearabley subtle and wouldn’t show my mistakes as much! I squeeze normal acrylic paint into a yogurt pot, and printed the dots with the back end of a pencil. 


Untitled


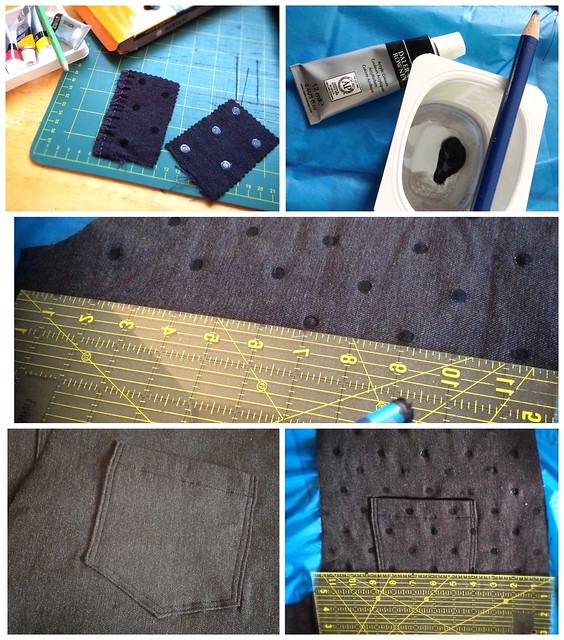
There are a million and one ways to plan out how to space the dots, but I went for the simplest: My clear ruler! I did my dots every 2”, then eyeballed the ruler down 1”, and did the next next row. I started by lining up the ruler with the top of the pockets, and was pretty pleased with how consistent my spacing was with very little effort. One benefit of sewing is that we get really good at estimating small distances!


Looking at the finished pants, I’m actually shocked how well the two pant legs match up.


Polka Dot Pants!


(Check out the collage behind me that my husband made for my 30th birthday! There’s a different branch for each 5 years of my life, with collaged things to remind me of what I was doing at that age… the bug and leaf at the bottom are my parents (a biologist and a botanist), and the black branch is Jamie (who only wears black). All the leaves are made from cut-up free-with-magazine-purchase records, and the tree is made with fabric, natch!) 


The pants themselves are a bit of an experiment. I’ve been using and tweaking this Style Arc Elle pant pattern for about 6 months now, and been less and less happy with the fit. I decided to go back to my first version, with just my initial crotch scooping and back rise adjustments. And lo and behold, they are a much better fit! 


To figure out why, I started making a collage of my past versions… and realised I’ve already made 8 pairs! Fascinatingly (for me, at least!) the pairs I like all have distinct similarities in the fabric choice, as do the less successful pairs:


Many versions of Style Arc Elle pants!


Basically, I think I stayed too far from the suggested fabrics and stretch content, and lost the snug fit as a result! I ended up adding a whole inch to front and back pattern pieces for #6 and 7, after 4 and 5 were too tight, which in retrospect was way too much! I’ve taken 6 and 7 in on the legs since the photoshoot, but they still feel baggy. Too bad I did so much topstitching and can’t properly take them in all the way to the waist!


So why did my polka dot pair work better? Well, after wearing then, it’s clear that the fabric is much closer to a stretch bengaline than a stretch denim, as I thought it was when I bought it. It’s got almost 50% stretch, and don’t get baggy through the day. It’s snug without being TIGHT and showing every line underneath. Even better, I got the fabric for $3/m and bought enough to make a second pair! 


Of course, there are still creases and pulls in a few places, but I’ve decided that I don’t care. They are good enough, and trying to tweek them to be perfect didn’t actually make them any better in the end!


Polka Dot Pants!


Now a question for you! How do you decide where to place rear jeans pockets, and how big to make them? The pockets are my own addition to this pattern, so i just traced them off some other jeans. I tend to line up the bottom of the pockets with the bottom of the crotch curve, but I can’t decide if they would be more flattering higher, lower, bigger, smaller, or closer together! What do you think? 


p.s. Oh, and for the record, I wouldn’t normally wear all black - I was just trying to me it easier for the camera to capture the dark-on-dark tones! I wore the pants to school the other day with a coral sweater and coral/red/black floral tee, and felt much more like myself!)

Monday, October 21, 2013

Sew... Black Leggings and Red October!

#sewredoctoberOh HAI! See the joy in my face? I made leggings! Leggings leggings leggings! Leggings that DON’T SLIDE DOWN during the day! No, it’s not magic - it’s the Sewing Cake Espresso Leggings


To my delight, Steph asked me to be a pattern tester for the leggings back in September. I was particularly curious because I’ve quite happily made several pairs of leggings with a very similar one-seam Style Arc pattern. 


The pattern, as you’ve surely heard by now, is a really cool dot-to-dot style that drafts leggings for your exact measurements. I found it quick and intuitive to plot out. 


Since I was being a pattern tester, I timed each step: 


  • measuring; 4min

  • mapping the measurements and connecting the dots: 7 min

  • cutting and sewing: 30 min

Total time: 41 min (And forever after, just 30min needed!)


#sewredoctober


The major difference I found between this pattern and my other pattern is how it fits at waist and ankles. Because I drafted it to sit at my natural waist, it’s higher rise than my other pairs. I used sturdy elastic and a very stretchy 4-way knit, which means that it doesn’t budge during the day. No more being caught hitching up my leggings in public! (Seriously, why does someone always walk around the corner while I’m doing that?)


The leggings also fit snuggly at my ankle, which means that they also sit a bit higher, instead of length pooling at my ankles. That’s neither here nor there, but something I notice while wearing them!


#sewredoctoberNow, I’m not advocating leggings-as-pants with this photoshoot, but I thought you’d like to see how well they fit - you know, for science! No pooling, no bagginess. Seriously, since I made these, they are the only leggings I want to wear, and I only at *least* 10 pairs! (Bonus: I had enough fabric to make a pair of bike short ones for wearing under dresses next summer!) 


Done looking at my tush? Good! Because I also made my cardigan and tank! (A girl has to have something new to wear for a leggings photoshoot, ammiright?)


#sewredoctober


The tank is my current obsession, the Mission Maxi pattern, with a less-racerback back to cover bra straps! After I cut it out though, I realised I had 2 other near identical me-made tanks already (one the same fabric in a different cut, one the same sewing pattern in a slightly thinner stripe!) To make it slightly different, I added two layers of circular-ish ruffles. Now hopefully my colleagues won’t think I’m wearing the same top every day! 


And the cardi? It’s my #sewredoctober project! 


#redoctober logo


I bought this rayon jersey with the lovely Rochelle (aka. Lucky Lucille) in at JoAnn’s in Buffalo this summer. I couldn’t think what to make until I remembered this pattern! It’s McCalls M5890, which I blogged about making last year. I wear all 3 of those versions often still. This time, instead of having a long waterfall drape in the front, I curved the bottom edge up instead. I like how it makes it look like a different pattern!


Now that repeats are taking over my wardrobe, I’m wondering how obvious it is to people who see me every day! Can they spot the 6 identical pairs of pants, or the endless parade of Tiramisus? I’m hoping not! But then again, why should it matter? 


Do you avoid identical-looking clothes in your me-made wardrobe? And have you experienced the joy of perfectly fitting leggings? Because if you are looking for a pattern, I’d definitely suggest the Expressos!


Friday, October 11, 2013

Giving Thanks!

Happy Canadian Thanksgiving, everyone! I’m been pretty quite on the blog and Twitter lately - but I’ve got a LOT to be thankful for. My husband and I moved, and now we have our own apartment! 


We’d been living with my parents for two years, since we moved home from Japan - bless them for putting up with us for so long! We’ve now moved about 45 min away from my hometown, to the small city where I went to university. It was strange to “move out” from home to the same place, 13 years later! 


I haven’t sewn in a few weeks, so instead of posting a new make, I’m going to show pics from the move!


Untitled


Packing up, stuffing everything in the garage before the moving day!


We both love our hobbies (comics, music and video games for Jamie, and obviously sewing for me!), so we’ve treated ourselves to renting a 3-bedroom apartment. It’s clean and well cared-for, but not the most glamourous… in return, we each get our own hobby room! It’s a real luxury, but one that makes us both very happy.


Untitled


Our new home.


I counted at some point that I’ve lived in about 14 places in the last 13 years! Some of those were shared houses in university, and at least 6 of them were in Japan. It was such an amazing joy to move from one place to another in Canada, with friends and family to help! We had 15 people help us out on moving day, and we’ve furnished the entire place with donations from out families! We’ve got furniture from both our grandparents and our family homes, which makes for a lovely homey feeling right away. We really couldn’t have done this without so much wonderful support!


One unexpected joy of the move was digging out little treasures from my last Canadian apartment 6 years ago. I’m particularly pleased to see how consistent it all is with my wardrobe colour palette!


Untitled


Of course, I wouldn’t be much of a Sewcialist if I wasn’t also planning to decorate with fabric…


Untitled


I’ve been hoarding all of these for quite a while! The two obis (top left) were bought in 2005 in Kyoto… the vintage cotton kimono fabric (top right) and fat quarters (middle right) were bought in Tokyo in anticipation of our first home in Canada… and the hexagons were pieced at the cottage last year ago from scraps of clothing projects! The only new fabric is the cotton chambray that I’m using with the fat quarters to make half-square triangle throw pillows, but even that is special to me. Clare from Sew Dixie Lou and I bought matching fabric at a blogger meet-up when she was here in the summer, so I’ll think of the Sewcialists every time I see it! 


There we have it. I’m thankful for my wonderful husband and our new apartment, I’m thankful for my family and friends. I’m thankful for the beautiful things in my life that make me glad every time I see them, and I’m thankful for the Sewcialist community! I’m one hell of a lucky lady, and I try to always remember it! 


Happy thanksgiving, everyone!