Thursday, February 28, 2013

Sewcialism is sweeping the nations!

Do you sew? Do you blog or tweet about it? Then YOU, my friend, are a social sewist: A Sewcialist! 


One of my great joys already this year (a whole 2 months in!) is getting more involved in the Twitter sewing scene. It’s so exciting to be able to contact with people worldwide in real time. If blogging presents snapshots of our best selves, then tweeting gets closer to who we really are. The jokes, the frustrations, the questions… and of course, the same wonderful support and kindness that abounds in the blogosphere! 


And somewhere in all this tweeting madness, the Sewcialist project was born. (There are big things planned - of which this is just the start!) We’ve coined a name for ourselves… and now it’s time to coin a look! 


The Sewcialists are seeking emblem designs for our budding community of sewing aficionados. Basically, a logo that we could use online, and that you could print out and use to make your own Sewcialist swag! 


Here are the details: 


Who are the Sewcialists?


Sewcialists are those who sew and chat about sewing, fabric stashes, etc on social media.


What are we looking for? We are looking for a design that:


  • Relates to sewing and the social nature of sewcialists

  • Is modern, simple, recognizable and memorable

  • Is useable in black & white as well as in color


What will the winner win?


  • A 1 year subscription to Make magazine


  • A $100 cash prize. The cash prize of one hundred US currency will be paid through PayPal only

  • A custom ipad sleeve

We are proud to have MAKE as our official competition sponsor! They’re the ones giving the winner the subscription.


Deadline for submissions is April 20th. Submit to jury [at] sewcialists [dot] org


We have a sewcialists jury of 10 who will be blogging about this contest. Check out the jury list at sewcialists.org.


General Voting


April 24 until May 8: The jury members will open up general voting on the designs that made it to the final round.


  • Voting will happen via comments on the jury blog posts

  • Every sewcialist has one vote per jury-blog

  • One person can vote multiple times (as long as it’s on different jury-blogs) on different designs, or on the same design.


Any questions? Ask away! And please share this contest with your friends - the more submissions, the merrier! It’s open to anyone from professional to amateur designers. The fine print can be found at sewcialists.org.

Friday, February 22, 2013

First Dress from my Sloper!

Making and Using a Bodice Sloper


BAM! There it is. My first dress made with my self-drafted sloper! 


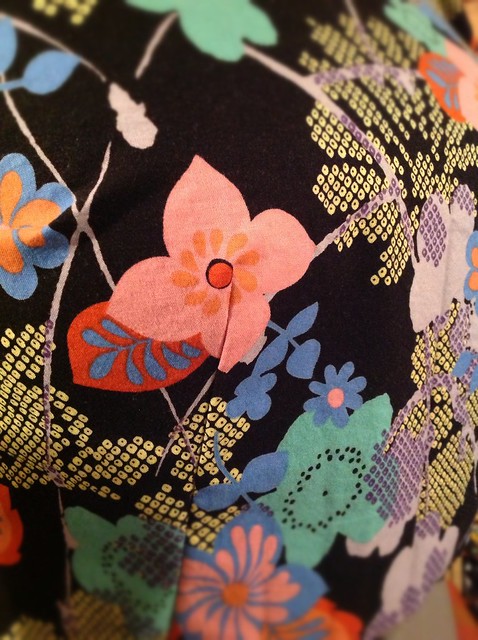
Obviously, the fabric is the star. I bought this in Japan just before leaving, when I was starting to think about making clothes… and I’ve been hoarding it ever since. I’m a BIG fan of bright florals on dark grey or black, and the Japanese elements and crazy colours just make me so happy. It’s quilting cotton, but that’s ok with me for a dress like this. 


Of course, with any large floral you have to be careful with placement… so I checked and double checked before I cut the bodice. But as you know, THIS happened: 


Making and Using a Bodice Sloper


Seriously? I tried to hard to avoid this! Boo. :( 


Oh well. I’m counting on the busy print to distract. What do you think? 


Making and Using a Bodice Sloper


STOP LOOKING AT IT! :P 


On to other details… I lined the skirt, added pockets, and even practiced my piping skills on the neckline. This came before Bimple and Pimple and I were #sewingdared to use piping, so it doesn’t count. (How amazing is her piped Hollyburn though?)


I wore the dress for the first time to see my husband perform in a community theatre version of How to Succeed in Business. He studied Drama in University at a rather elite program, and it’s a big part of who he is. I’ve seen him direct three student performances, but I’ve never seen HIM on stage. Guys, he’s so good! (Yup, I’m biased!) It made the long commutes to rehearsal (1-2hrs each way) all worth it. One of the reasons we moved back to Canada was so that we could pursue our passions and build community - and I’m so pleased that we are both doing that in our own way!


PicMonkey Collage


What do you and/or your partner nerd out about besides sewing?

Wednesday, February 20, 2013

Awesomesauce Updates

Just a couple bits and pieces:


  • My sister is doing a “colourRIOT” series on her knitting blog, with all kinds of guest posts lined up (including moi!) and really cool stuff about colour theory. She went legally blind at one point due to cataracts (from diabetes) and lost a lot of her colour vision… Now that she’s had surgery and regained her full sight, she’s got a really unique perspective and passion for colour! Go check it out!

  • Sewcialism has hit the twiiterverse! A sewcialist is anyone who sewing and tweets/blogs/talk about it online. I am most definitely a sewcialist, and I bet you are too! (If you aren’t, seriously, come check out the sewing community on Twitter. It’s really amazing!)

  • Have you mapped yourself yet? Vicki from Another Sewing Scientist had the brilliantly simple idea to make a google map to show all of the bloggers worldwide! I’ve been checking every day andreally enjoying watching it fill up. If you haven’t added you own location, go to her blog and check it out!

  • Speaking of Vicki… She is coming FIVE HOURS from Montreal to join us for our Toronto Sewing Meet Up! We’ve got 16-18 people coming now, which just blows my mind. Sewcialists are the best! I’ve been busy making name tags… Now I just have to decide what to wear!

For those of you joining us, here are the details one last time:


Toronto Sewing Blogger Meet-Up


Where: Meeting outside Le Gourmand Café (152 Spadina Ave, Toronto, ON M5V 3S6, roughly at the corner Spadina Avenue and Queen Street West.)


Here is how it’s going to go:

We will meet at 1:45 to introduce ourselves and give everyone a chance to arrive. Those who wish to use the restroom or grab a delicious coffee from Le Gourmand are welcome to do so at this point. We will be hitting the shops at 2PM. We’ll wander down Queen West and investigate the fabric shops between Spadina and Bathurst. At the end of our shopping, we will head to Tequila Bookworm for some food, drinks, and fun! We expect to finish at roughly 4 or 5 PM.


At the restaurant, we are going to have a fabric and pattern swap! Bring along any fabric or patterns from your stash that you just don’t think you’ll use anytime soon. One woman’s stash is another woman’s treasure! Bring as much or as little as you want. We’ll trade our goodies and come home with something new and exciting!


At that point, the official meet up is over… But if you’re up for some more adventures, some people might hit the shops again, or stick around for dinner and drinks.


If you haven’t received any emails from us, please email me at crafting.a.rainbow.blog@gmail.com

Thanks everyone!

Tuesday, February 19, 2013

New Year's Resolutions: Making a Dress Sloper!

Sewing goals for 2013


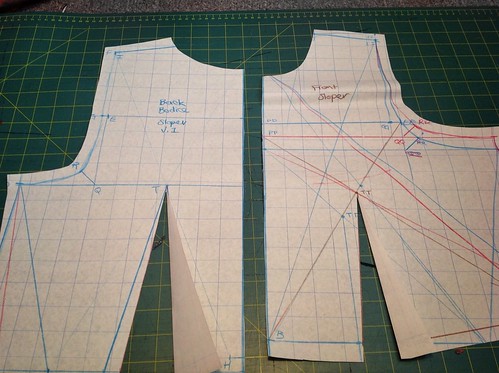
I did it! In fact, I did it a month ago… and couldn’t face blogging all the details! Making a sloper was fun but slow - I tried 3 different strategies, made at least 6 muslins, and ended up with something that… well, fits as well as a RTW pattern that I’ve modified. Hmmm. 


I don’t want to bore you to death, so I’ll try to keep this quick!


Method #1: Work form a well-fitting RTW pattern.


Making and Using a Bodice Sloper


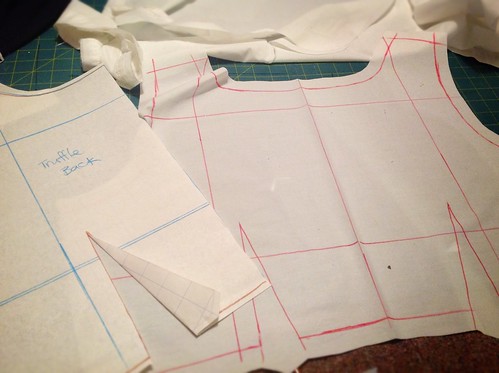
My Truffle dresses fit really well, so I thought that was a good starting point… but somehow I misplaced the traced version that i’d already modified, and had to start from scratch.


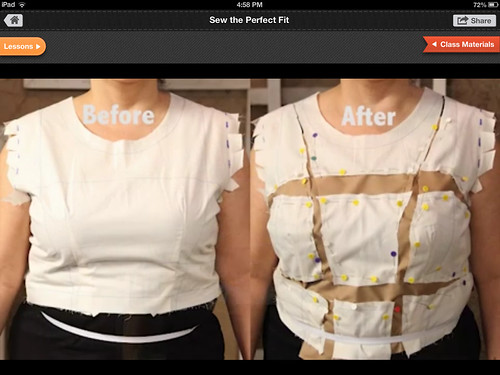
To alter the sloper, I tried applying what I’d learned from the Craftsy course, Sew the Perfect Fit. Sounds promising, right? The method is all about slashing and spreading, and adding in strips of fabric, until your horizontal and vertical grainlines are perfectly aligned at horizontal or perpendicular angles to the floor. 


Making and Using a Bodice Sloper


Sounds easy, right? Well, kinda. It was easy enough to slash and spread, but after I found it surprisingly difficult to know what to do where! (For example, how many of you get the upper back puff on Colette patterns? I’ve always taking in the centre back seam to get rid of it… but this time I did a big swayback adjustment and the problem disappeared! If both horizontal and vertical solutions work, how is one to know which one is best?) 


Eventually, of course, I found the Truffle pattern that I’d modified before! When I compared the two, the sloper version I’d been working so hard on was AT LEAST a few sizes bigger than the one I’d used before, and differently proportioned… and so I gave up. Maybe I just had no idea how to fit things? Grrr. 


Method 2: Math!


Making and Using a Bodice Sloper


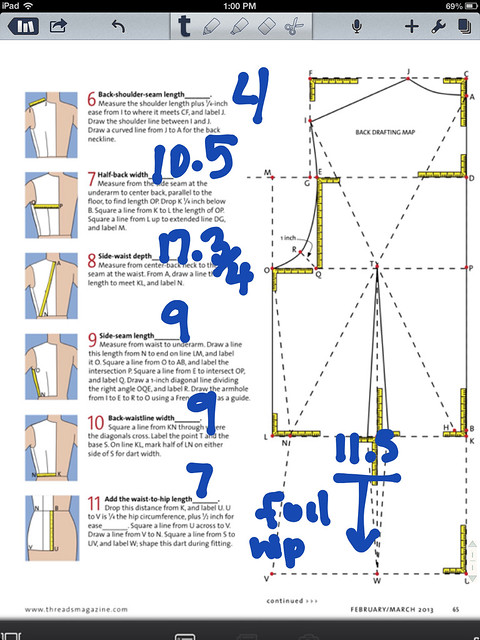
 I have to admit, I really enjoy the drafting of the paper pattern. With my sister’s healp, I took all my measurements and recorded them right onto a PDF tutorial from Threads. As a new owner of an iPad, playing with a new toy kept me happy! 


Making and Using a Bodice Sloper


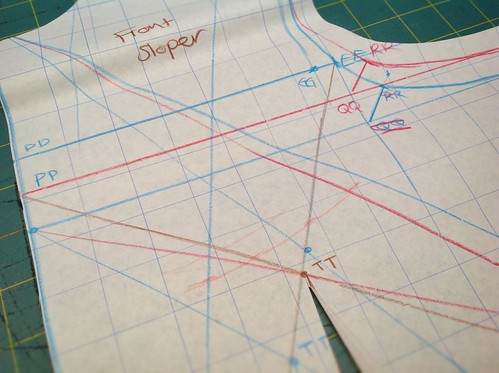
From there, it really wasn’t too hard to follow the step-by-step instructions and draft out the back bodice. But by time I got to the front I was getting tired, and this happened: 


Making and Using a Bodice Sloper


Yeah, that would be a WHOLE lot of mistakes and corrections!


The exciting part was that after all that math, this pattern at least FIT. I did a small FBA using the slash and spread, and then it was ready to go! Ready to become…. THIS!


Making and Using a Bodice Sloper


Yes, the most nippley of nipple dresses! But more on that next time… ;) 


The Verdict: 


The Good: I learned a lot, tried a few new techniques, and now I have a bodice sloper! It fits and I’ve already used it to make a dress. Mission accomplished! 


The Bad: What I’ve really done is drafted a bodice block. It doesn’t fit super-tight like a sloper, and I’m not convinced that it has the “perfect” armhole curve etc that I would use to adjust other patterns. I also tried drafting sleeves, but couldn’t get them right!


Final Thoughts: Give it a try! i might sound a bit down on the whole process, but I really did enjoy it. It was a fun challenge, and I’m proud to have given it a shot!


Have you ever made a sloper? How did you go about it? Do you actually use it in your sewing? 


Sunday, February 17, 2013

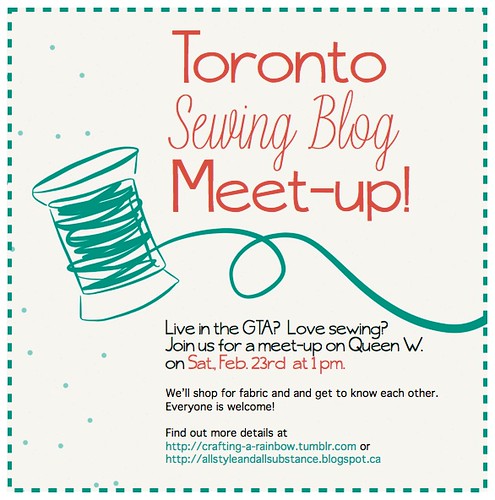
Toronto Sewing Blog Meet-Up: The FInal Details!

Toronto Sewing Blogger Meet-Up


OMG, it’s really happening! Our sewing blog meetup is this coming Saturday, and we have FOURTEEN people coming! Squeeee!!!!!


Just in case any of the people attending didn’t get the email we sent out today about the final details, here are the important facts: 


When: Saturday, February 23. 


Where: Meeting outside Le Gourmand Café (152 Spadina Ave, Toronto, ON M5V 3S6, roughly at the corner Spadina Avenue and Queen Street West.)


When: 1:45 PM, Saturday, February 23. (No 1pm like the graphic above says!) 


Here is how it’s going to go: 

We will meet at 1:45 to introduce ourselves and give everyone a chance to arrive. Those who wish to use the restroom or grab a delicious coffee from Le Gourmand are welcome to do so at this point. We will be hitting the shops at 2PM. We’ll wander down Queen West and investigate the fabric shops between Spadina and Bathurst. At the end of our shopping, we will head to Tortilla Flats for some food, drinks, and fun! We expect to finish at roughly 4 or 5 PM.


At the restaurant, we are going to have a fabric and pattern swap! Bring along any fabric or patterns from your stash that you just don’t think you’ll use anytime soon. One woman’s stash is another woman’s treasure! Bring as much or as little as you want. We’ll trade our goodies and come home with something new and exciting! 

Can’t wait! 


***************


So, for those of you nowhere near Toronto: Who is the first sewing blogger you me in real life? How did you meet them? How did it go? 


Thursday, February 14, 2013

When Crafting Hurts: How do you make it better?

Untitled


Wow, guys. I’m seriously blown away by how many responses I got from other people with RSI on my last post. I thought it was more common than people let on, but I didn’t know that it was THAT common! 


Some people developed RSI (repetitive stress injuries) at work, and others pushed too hard on big projects. Knitting and cutting with bad scissors were also mentioned, as well as waitressing and playing instruments! My guess is that the key thread to all of this is that we didn’t use good tools, or we didn’t use them properly. I wonder how many of us missed warning signs that something was going wrong? 


Interestingly, we’ve found all kinds of different solutions, including: 


  • physiotherapy and chiropractors

  • cortizone injections

  • ice packs

  • wrist braces

  • acupuncture

  • sonograms

  • yoga and other strength training

The saddest solution of all for a crafter? Giving up the crafts you love! (True story: I decided to try crocheting this fall, using the same yarn from the afgan that gave me RSI. I crocheted just a single little granny square for a few nights in a row… as careful as I was, it took weeks to recover. Sad.)


Enough whining though! I feel really, REALLY lucky that after years of doctors telling me to live with the pain, I found a physiotherapist who believed I could improve! Here are the exercises he gave me - I hope they help some of you too! 


**NOTE: I am not a doctor or physiotherapist… and since I was living in Japan at the time, my physiotherapist and I spoke in a blend of Japanese and English! If  I missed some subtly of the exercises, I’m sorry!**


The Basic: 


Ok, now you try it! :) 


Step 2: Forward and backward


Your turn! 


Step 3: Pelvic roll


That “Wow!” at the end? That was me straining my back by holding it too long! :P Must remember to do these exercises more often these days! 


Another version of this was a bit too porny to video: Kneel on the floor, and arch your back up like a cat, then flex your back down while sticking out your arse. Keep your chin up while you do it. My physio called it cat and dog. I think of it as butt and boob! Somehow people always took this exercise as the chance to come practice English with me… :P 


Step 4: Variations!


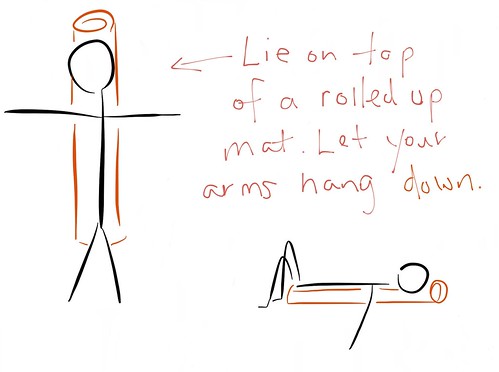
Here’s a diagram of the, uh, crucifixtion pose that I mentioned…


Physio Excerises for Crafters


You’d probably need two yoga mats put together for length. This one feels really good though - lie there and let your arms stretch back for about 2-3 minutes. If you hunch forward like me, you’ll really feel the stretch across your upper bust!


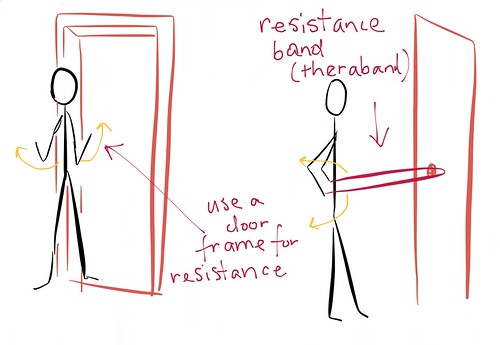
Here’s a few I didn’t mention in the video…


Physio Excerises for Crafters


On the left: Do the same exercise as I showed in the first video, but stand against a door frame so that your shoulder blades press against the 90* angle of the frame. The resistance is good strength training. SImilarly, use your rolled mat for resistance while sitting or lying down. 


On the right: Buy a theraband/rubbery resistance band and hook it around the doorknob while you do the same first exercise. You can face towards the door or away from it!


And there we have it! There is no specific order to the exercises. You could do one rep of 20 for each, or repeat a second time. Please let me know if any of my explanations are confusing! 


My goal is to raise awareness of RSI, and to get us talking about it. It seems clear from your responses that there are many possible solutions… but also that it is something we need to take seriously. I wish someone had told me at the time that it could become lifelong and chronic - I would have made smarter choices from the start! At the same time, writing these posts has made me realize that I’ve been slowly letting things deteriorate again… it is time for me to be more vigilant! 

Sunday, February 10, 2013

When Crafting Hurts: Repetitive Stress Injuries

Untitled


Once upon a time, I was a knitter. Not a great knitter, but a voracious one. One week, I set to work knitting an afgan. Knit, knit, knit. I’d come home from my office job where I worked as a writing, and knit, knit, knit. Until suddenly, everything when haywire. 


Almost overnight, my wrists started burning with a deep pain, my fingers went tingly and numb, and pretty soon my elbows followed suit. I stopped knitting, got more ergonomic supports at work, bought drug-store wrist braces and wore them all day and all night. Still, there were a few weeks where I couldn’t even chop up vegetables to cook or carry a travel mug to work - the pain was that bad. 


Since I’m an idiot, I googled it, and self-diagnosed as Carpal Tunnel. I figured there was nothing doctors could do, so i didn’t go. People, don’t do that. Ok?  Please? Thanks. I don’t know if a doctor could have helped, but I wish I’d tried. 


That once upon a time? It was 7 years ago. And my arms have hurt every day since. 


The first 7 months were the worst - because I was working as a writer, I had to type all day. I’d take a secret break midday and listen to the radio while pretending to work, and bring in my own laptop when using the mouse hurts too bad. Luckily, when that contract ended and i went to teacher’s college, the symptoms dulled and become more like tendonitis. Around that time I had some testing done, and saw a surgeon. They gave me meds off and on for years, but nothing changed. 


Cut to 3 years later. I’d gotten used to using dictation software to write my report cards, and figured out ways to ask my students to do things that I couldn’t. I still slept in braces, and iced my wrists often. But when my husband found me crying about it, he decided it was time to stop accepting it and find a way to get better. 


And you know what? Thank goodness he did. I went to see a doctor who told me quite calmly in Japanese that I’d never get better, and looked at me funny when I bawled. Trying to appease me, he said I could try physio therapy. And hallelujah - within 3 months I was 90% better, and able to live normally again! 


Now tell the truth: How many of you have a similar story? I’ve been talking to quite a few people on Twitter lately who admitted to having some degree of RSI at some point, either from cutting, knitting, or sewing big projects. I think there might be quite a few of use who have just accepted that the hobbies we love sometimes cause discomfort… but I’ve learned the hard way that pushing through that initial pain can have serious repercussions.


Talking to my tweeps, some people improved with rest; others favour yoga or chiropractors; some are just living with it. Since I was lucky enough to find a physiotherapist who helped me, I thought I pass on the good karma:  Later this week I’ll post a couple how-to videos of the exercises that helped me. I hope they’ll help someone else too!


Have you ever had pain from crafting? Did it go away, or become chronic? I’d love to hear your stories! If nothing else, I hope that sharing ours experiences can help someone else recognize the warning signs and step away before it’s too late! :) 

Thursday, February 7, 2013

Is Clothing Art?

I really don’t know the answer - but boy, is it a fun topic to talk to kids about! 


Grade 1 Fibrecrafts!


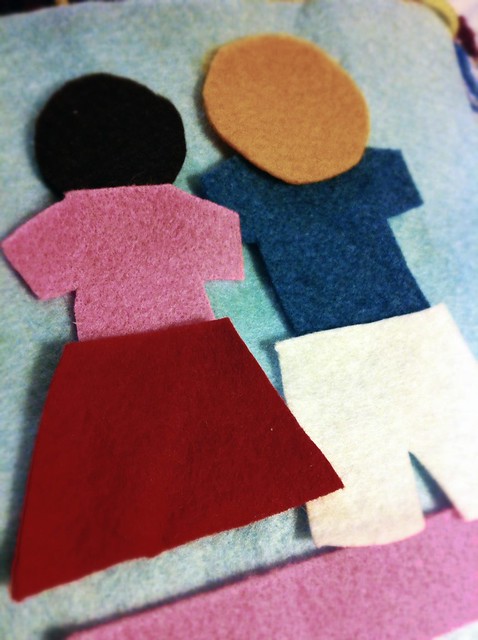
(Our classroom feltboard)


This week I’m shamelessly ripping off the amazing Liza Jane Sews, who was kind enough to email me a detailed lesson plan of how she teaches Grade 1s to become fashion designers in their own right! It’s a really brilliant series of lessons: first look at designer sketches, then come up with their own. Choose a favourite, and collage it onto a large piece of paper… then cut out an oval so they can hold it up to their faces to “try it on”! 


The first day, we talked about fashion as art, and how the clothes make up feel. I’m tying it all loosely to studying texture, colour, and seasonally appropriate clothing, but the real fun is share my love for sewing with them! At age 6 or 7, they are already really concerned with fashion… which makes me a little nostalgic for the pastel track suits I was wearing at that age! Instead of focusing on trends or looking “cute”, I’m trying to emphasize how clothing can make us feel happy, confident, and confortable with who we are. Big topics for little people! 


I’m not allowed to share pictures of student work online, but I wish i could - they are hilarious! It’s such an amazing age, when some kids still have feet directly attached to the heads of their figures, and some have amazing detail and relatively proportionate figures! 


Grade 1 Fibrecrafts!


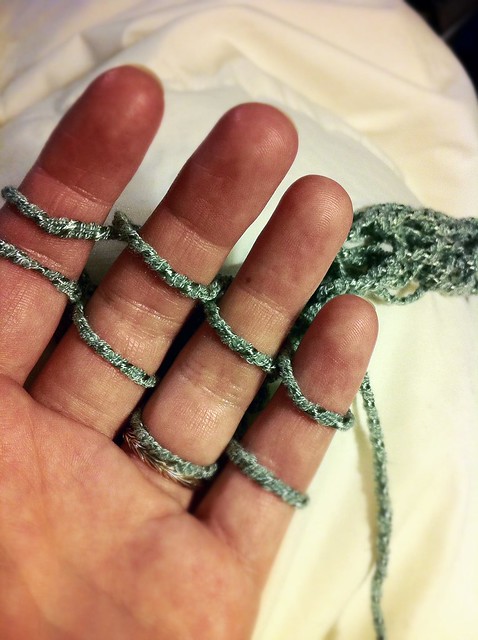
(Fingerknitting)


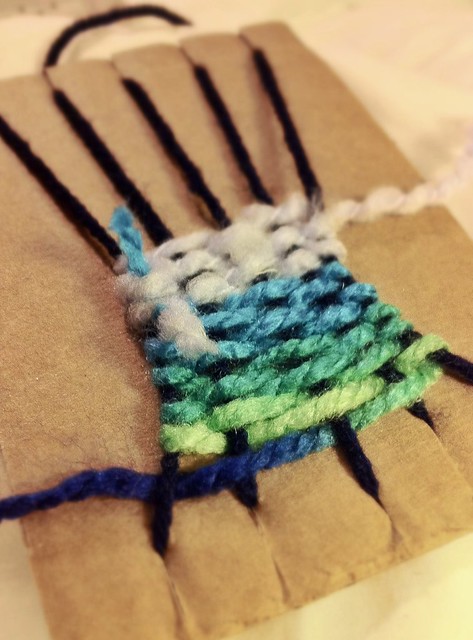
To go along with the project, I’m introducing our feltboard, yarn, cardboard weaving and finger knitting as activities during out playtime. Bring on the fibre arts!!!  


Grade 1 Fibrecrafts!


(My practice run weaving on cardboard - Looks just like what a 7 year old can do! :P)


As for clothing as art: I’m undecided. My gut says, “No”, but my husband says “Yes”! The kids are undecided, but I’m pretty sure that once they “make” their outfits, they’ll be convinced it is high art! To continue the discussion, I’ve promised to wear my Sharpie Dress tomorrow. They seem to think of art as 2-d involving drawing, so I’m curious what they think of a 3-d, wearable marker doodle!


Sharpie Dress


What do you think? Is clothing art? 

Monday, February 4, 2013

For You February

I started sewing clothes almost exactly a year ago now… and in that time I’ve made easily upwards of 50 garments. That’s what happens when you choose simple and quick projects, I guess!


As I head into this second year of sewing, I’ve started to wonder: How am I going to keep this up? I don’t *need* another 50 garments this year - My closet won’t take it! I’ve thought about taking on more challenging projects so that my output would slow… but honestly, those kinds of projects don’t bring me as much joy as a t-shirt! Instead, one of my new years resolutions was to give away more of my makes. I’m lucky enough to have a mom and sister who will wear and appreciate anything I make, so it’s time to fill their closets instead!


As it happens, I’m no the only one feel that way this month. Over on Twitter this weekend, a few other people mentioned taking a break to sew for others… So we declared it “For You February!”


For You February


As it happens, sewing gifts is also the theme of the Stashbusting projects for February too! 


It’s funny that just a month after Christmas, I’m already itching to sew for other people… but there is something particularly fun about sewing up an unexpected gift! No deadline, so expectations - just a way to say “I love you!” with fabric! 


(That’s not to say that I won’t be making for myself this month… I tried making underwear for the first time last week, and I’m hooked!)


Do you have any projects planned for friends or family? Feel free to grab the graphic… Somehow having an official button/title always makes me more motivated! Do you feel like that too?

Sunday, February 3, 2013

Updates on Sewing Dares!

It’s been a month since #sewingdares broke out on Twitter, so I thought it was high time to recap! I’ve been updating my original post as people completed their dares. I’m so impressed with how people took their sewing dares to heart! 


Sewing Dares


Now remembers, the official rules of Sewing Dares are: 


  1. Have fun. Stop if it is not fun. 

  2. There is no rush - Do your dare whenever you want! 

  3. Did I mention to have fun? 

The dares were all designed to be a bit of a challenge for each invidual, but nothing too stressful. Some people took on big projects, and others chose something small. I’m up to at least 4 dares myself - I’d better get cracking! 


Here are the finished dares so far: 


There dares are still in progress


  • Hot Mess Heifer is going to make not 1, not 2, but 3 t-shirts! (She already had one cut out - Head start!) 

  • Seamless' Elena has been dared by SewBusyLizzy to make one dress for work, and style it 4 ways!

  • Clare from SewDixieLou: Make an everyday, “signature” dress from her vintage stash

  • Inge from IngeMaat: Remake one of her least “Top 5 Fails” from 2012 into something (anything!) that she loves or is useful. 

  • Sown Brooklyn will make something designed/drawn by one of her kids! 

  • Ginger Makes is going to bite the bullet and make a bodice sloper! Oh yeah - and she let Oona pick out fabric for her next Mood Network project!

  • Erin at Dog Under My Desk is going to sew a t-shirt! (You won’t regret it - T-shirts are my favourite sewing project!) 

  • Amity Originals is going to make trousers! (Brave woman!) 

  • Suzy Sewing is going to do two dares: Make a t-shirt AND use a croquis for sketching dress designs.

  • My awesomesauce sister Anne is a dye-hard knitter (See what I did there? Hahaha - puns.) She’s going to design and co-sew a knitting project bag! She’s started with a Pinterest board full of ideas

  • OonaBallona has accepted a dare from GingerMakes and SownBrooklyn to make her dear husband a shirt! Will there be vibrant spandex leggings to match? 

  • In return, Oona has challenge ME to make a maxi dress - out of Liberty Lifestyle? Eeek! I’ve also been dared to use piping, and learn to rotate darts.

  • Buzy Lizzie in Brizzy is going to make a vintage shirtdress! 

  • Buckingham Road has accepted two dares: Make something out of knit, and make pants, a skirt or a dress to go with her fantastic Cordova Jacket! 

  • Thewallinna gave herself a serious challenge: Finish her couture dress!

  • Falling Through Your Clothes has too much in her stash (poor woman! :P) so she is going to use one piece to sew something for herself, and give away another piece or use it to sew for someone else!

  • Made with Hugs and Kisses is in training to be a teacher, so I’ve dared her to sew an interview dress

  • Suzanne of http://mybeaubaby.blogspot.com/ has been dared by Oona, Ginger and others to make a garment that she’ll proudly show the guts of, perhaps to the point of it being reversible. 

  • Kate took a break from blogging to plan her wedding, but she’s officially Mrs. Nakano now, and she’s got a new blog to match! She’s been dared to make and blog something in the next ten days - by Feb. 13th!

  • Jamie at Such a Strange Girl is going to make her first knit top! 

  • Sally from The Quirky Peach is going to use stash fabric to make one of the new indie patterns she bought recently! 

  • Andrea at Stitch Parade is going to make a garment (using a print!) that celebrates her new life this year on the west coast of Canada. 

  • GMarie is going to recreate a RTW dress with red cherries from Vogue 8728! 

  • Rachel at My Messings is done hosting her Hollyburn sewalong, and is ready for a dare: To make something, anything, that goes under a dress! 


Overall, I’m so amazed by how many people jumped in and asked for a #sewingdare - I’ve met so many new bloggers through this, and become seriously addicted to Twitter in the process! Most of the people who finished seem to have enjoyed the challenge… though like most sewing projects, there were a few hitches along the way! 


For those of us with incomplete dares hanging over our heads… remember, stop if it’s not fun! One thing I’m learning about sewists as a community is that we take rules and promises to complete things seriously… but really, if you ever wish, you can change your dare! If it’s not exciting and motivating, there’s no point, right? This is our hobby, for goodness sakes! :) Make it fun. 


If that hasn’t scared you off… There’s always space for new dares! If you want one, just leave a comment below or hollar at my on TwitterGet the graphic yourself, and start sewing/blogging/daring more sewists! 


 Happy sewing!